Restoring Backups
This guide explains restore operations in practical, real-world detail.
It covers:
- pre-restore checks,
- normal and advanced restore modes,
- config-specific and image-specific restore behaviour,
- progress/completion feedback,
- and how to verify the result afterwards.
Start a restore
- Go to System > Backups.
- Find the backup in the table.
- Click the Restore icon on that row.

Screenshot: Restore icon in a backup row.
The restore dialog opens and begins loading metadata/checks.
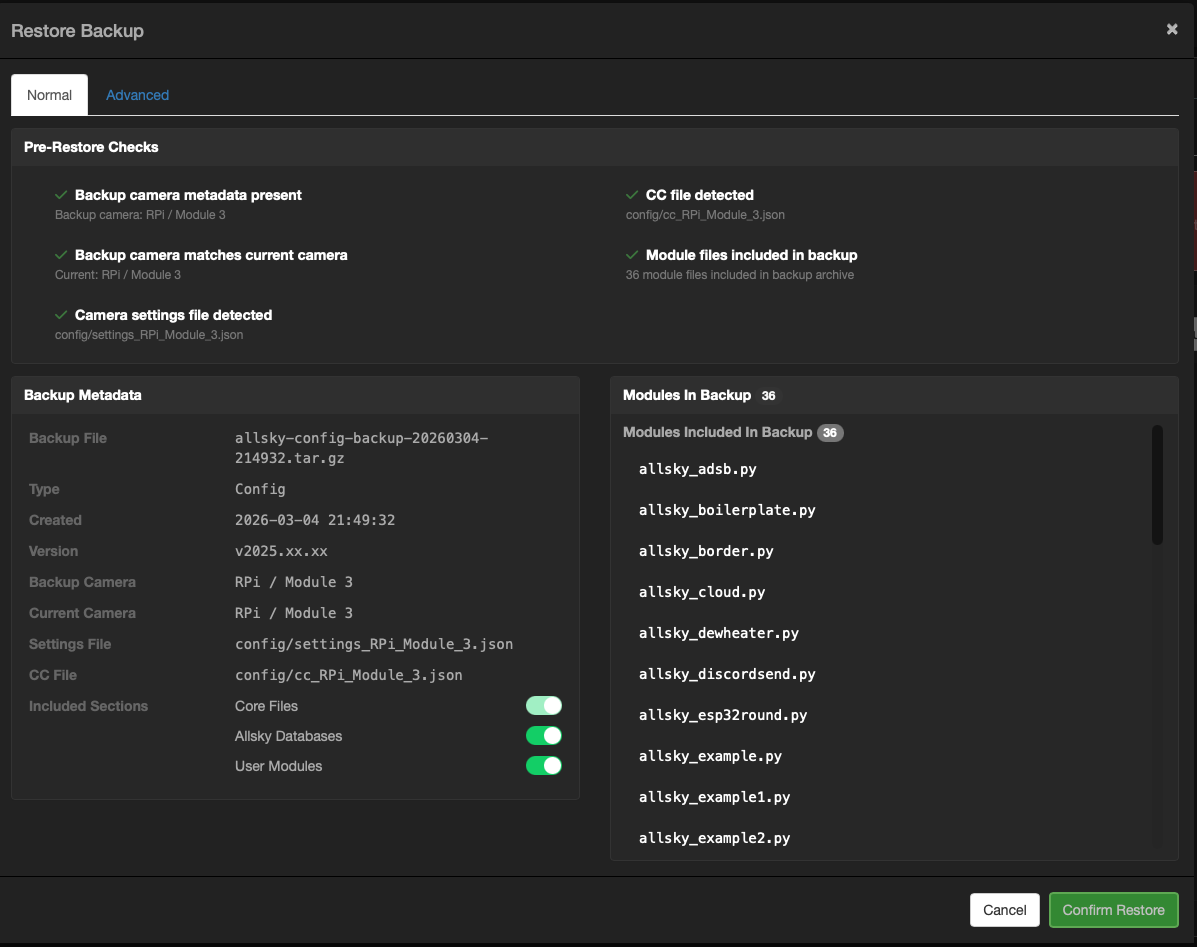
What the restore dialog shows
The dialog is split into key areas:
- Pre-restore checks: pass/fail checks with details.
- Backup metadata: file, type, version, camera, sections.
- Content panel: module/image details depending on backup type.
- Mode tabs: Normal and Advanced.
Screenshot: Restore dialog with checks, metadata, and mode tabs.
Understanding pre-restore checks
Checks are there to prevent invalid or risky restores.
You may see checks for:
- valid backup metadata,
- camera compatibility,
- required module availability,
- selected folder/file validity,
- section selection validity.
Each check shows:
- green pass icon or red fail icon,
- and detail text explaining what was evaluated.
Warning
If a blocking check fails, restore confirmation remains disabled until the issue is resolved.
Normal mode vs Advanced mode
Normal mode is recommended for most restores.
- Config backup: choose which included sections to restore.
- Images backup: choose which folders to restore.
This mode is faster to operate and less error-prone.
Advanced mode is for targeted recovery.
It provides a file tree with:
- collapsible folders,
- search,
- select-all / select-none,
- parent-child checkbox propagation.
Use this when you need to restore only a few files.
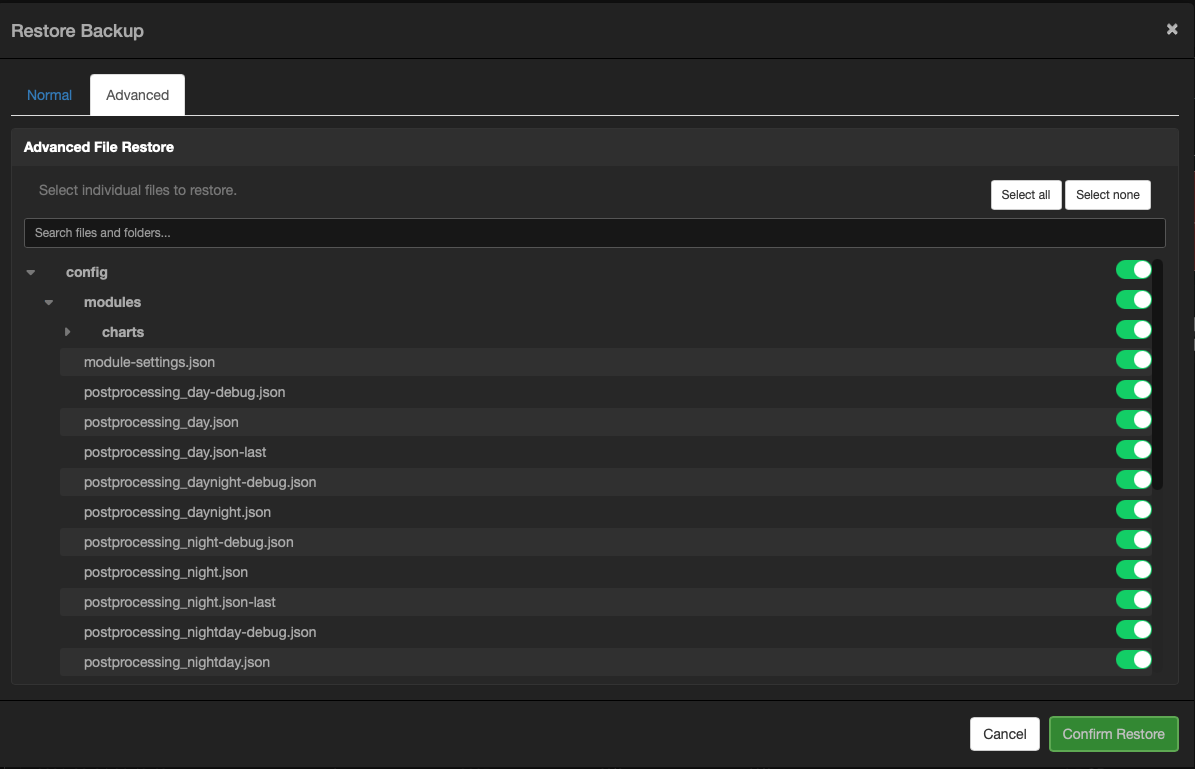
Screenshot: Advanced mode file tree with search and hierarchical selection.
Config restore behaviour (important)
For config restores, Allsky performs a controlled sequence:
- Stop allsky service.
- Extract selected restore targets.
- Restore camera-aware links (
settings.json,cc.json) as required. - Reapply owner/group/mode from metadata.
- Start allsky service.
This is intentional and improves consistency when replacing active configuration files.
Camera compatibility rule
Config restores are camera-safe.
If backup camera type/model does not match current camera, restore is blocked.
Module availability rule
Module checking depends on what you selected:
- If module files are included and being restored, module presence checks are relaxed.
- If modules are not being restored, required modules are validated against local module paths.
Images restore behaviour
Images restores can be broad or granular:
- restore full image folders,
- or restore specific files in advanced mode.
Permission/ownership metadata is reapplied after extraction where metadata exists.
Confirming restore
When checks pass and your selection is complete, click Confirm Restore.
A restore progress modal appears.
Restore progress modal
The progress modal shows staged execution with percent progress.
Typical steps include:
- validating options,
- extracting selected content,
- applying permissions,
- finalising restore.
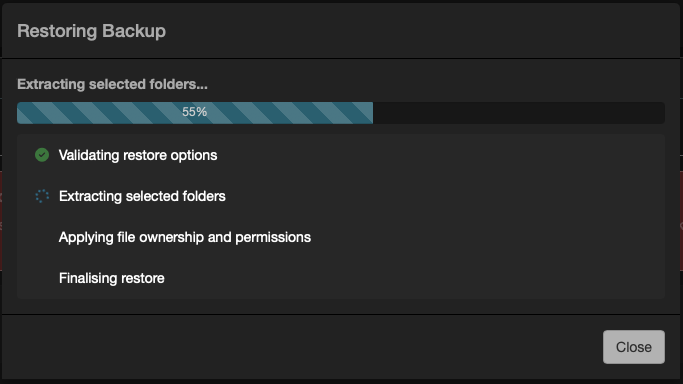
Screenshot: Restore progress modal while restore is running.
Note
For large restores (especially images), extraction can take time even if the UI appears to pause between steps.
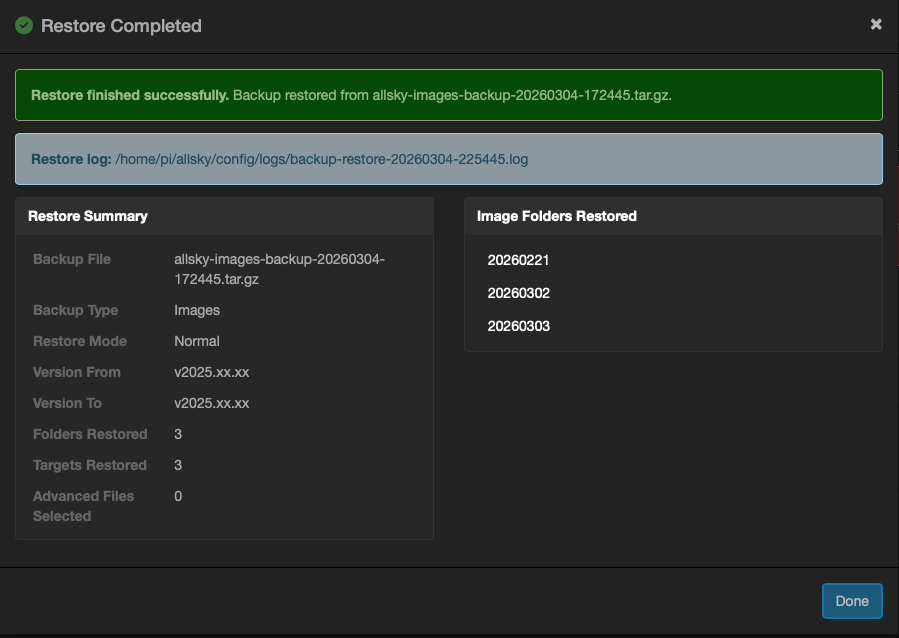
Restore completion modal
After success, a completion modal summarises what happened.
It includes:
- backup file/type/mode,
- version from/to,
- camera from/to (config),
- sections restored,
- files restored,
- restore log path,
- warnings if present.
For images:
- if whole folders were restored, folder names are shown,
- if individual files were restored, the restored file list is shown.
Screenshot: Restore complete summary modal.
Restore logs and traceability
Every restore writes a log file in config/logs:
backup-restore-YYYYMMDD-HHMMSS.log
This gives you a permanent record of:
- what was selected,
- what was restored,
- which steps executed,
- version/camera context,
- and warning information.
Tip
Keep restore logs when diagnosing behaviour after a rollback or targeted file restore.
Post-restore validation checklist
After restore, verify:
- WebUI loads normally.
- Service status is healthy.
- Key settings reflect expected state.
- Modules/pipeline behave as expected.
- Latest images and processing pipeline are functioning.
For targeted advanced restores, always test the exact component you intended to repair.
Recommended restore strategy
- Use Normal mode unless you specifically need targeted recovery.
- Use Advanced mode for minimal-change surgical restores.
- Prefer restoring from the most recent known-good backup.
- Review completion summary and log file immediately after restore.