Blocks
Blocks are designed to simplify the adding of fields to the overlay. Some modules, the solar system moduloe for example, produce a lot of variables that can be added to the overlay. Manually adding each one can be tedious.
Blocks are predefined groups of variables defined in a column/row layout that can be added to the overlay together.
Blocks are accessed from the variable managier when editing an overlay
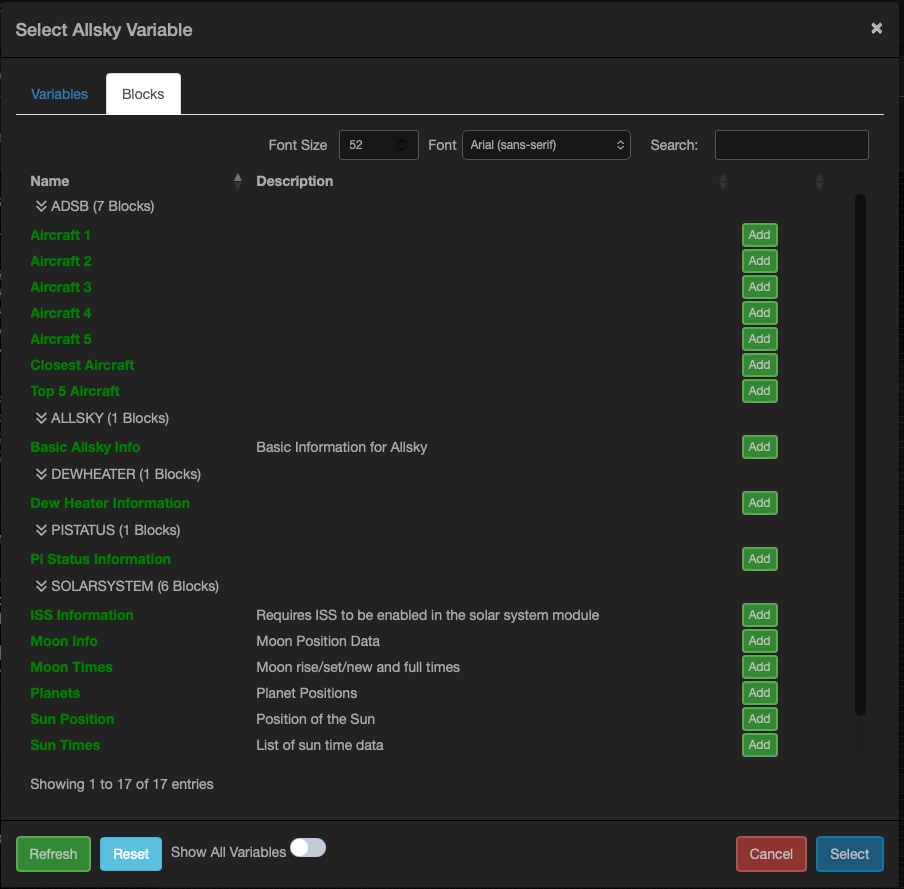
The blocks tab in the variable manager
Blocks structure
Blocks are json files that define one or more blocks that are made available in the variable manager. The following example is taken from the allsk_solarsystem module and defines two blocks related ot the sun
- The first block defines the variables to display for the Sun's timings
- The second block defines the variables to display the position of the Sun
There is no limit on the number of columns or rows that can be created in a block.
Field spacing
If you define multiple columns when the fields are added to the overlay the width will be set to the widest variable name. This is not ideal as the data may be muc narrower than the variable name. To get around this after the block has been added the user should select the variables in each column and line them up as required.
- The key name for each block can be anything, given the file is json it must be unique within the file
- The name is displayed within the variable manager
- The description is displayed within the variable manager
- The fields section contains each row and column. The keys to the rows are abritrary and the convention for the columns is colXX
- You do not have to use multiple columns you could just create a single column in each row that contains the field labale and data. Generally its better
- Each row does not have to have the same number of columns, see the top 5 adsb aircraft below
{
    "suntimesblock": {
        "name": "Sun Times",
        "description": "List of sun time data",
        "fields": {
            "sunrow1": {
                "col1": {
                    "text": "Dawn:"
                },
                "col2": {
                    "text": "${AS_SUN_DAWN}"
                }
            },
            "sunrow2": {
                "col1": {
                    "text": "Sunrise:"
                },
                "col2": {
                    "text": "${AS_SUN_SUNRISE}"
                }
            },
            "sunrow3": {
                "col1": {
                    "text": "Noon:"
                },
                "col2": {
                    "text": "${AS_SUN_NOON}"
                }
            },
            "sunrow4": {
                "col1": {
                    "text": "Sunset:"
                },
                "col2": {
                    "text": "${AS_SUN_SUNSET}"
                }
            },
            "sunrow5": {
                "col1": {
                    "text": "Dusk:"
                },
                "col2": {
                    "text": "${AS_SUN_DUSK}"
                }
            }
        }
    },
    "sunpositionblock": {
        "name": "Sun Position",
        "description": "Position of the Sun",
        "fields": {
            "sunrow1": {
                "col1": {
                    "text": "Azimuth:"
                },
                "col2": {
                    "text": "${AS_SUN_AZIMUTH}"
                }
            },
            "sunrow2": {
                "col1": {
                    "text": "Elevation:"
                },
                "col2": {
                    "text": "${AS_SUN_ELEVATION}"
                }
            }
        }
    }
}
The block defining the Sun position and timings
{
    "closest": {
        "name": "Top 5 Aircraft",
        "fields": {
            "ac1row1": {
                "text": "${AS_LONGTEXT_AIRCRAFT1}"
            },
            "ac1row2": {
                "col1": {
                    "text": "${AS_SHORT_ROUTE_AIRCRAFT1}"
                },
                "col2": {
                    "text": "${AS_MEDIUM_ROUTE_AIRCRAFT1}"
                }
            },
            "ac1row3": {
                "text": "${AS_LONGTEXT_AIRCRAFT2}"
            },
            "ac1row4": {
                "col1": {
                    "text": "${AS_SHORT_ROUTE_AIRCRAFT2}"
                },
                "col2": {
                    "text": "${AS_MEDIUM_ROUTE_AIRCRAFT2}"
                }
            },
            "ac1row5": {
                "text": "${AS_LONGTEXT_AIRCRAFT3}"
            },
            "ac1row6": {
                "col1": {
                    "text": "${AS_SHORT_ROUTE_AIRCRAFT3}"
                },
                "col2": {
                    "text": "${AS_MEDIUM_ROUTE_AIRCRAFT3}"
                }
            },
            "ac1row7": {
                "text": "${AS_LONGTEXT_AIRCRAFT4}"
            },
            "ac1row8": {
                "col1": {
                    "text": "${AS_SHORT_ROUTE_AIRCRAFT4}"
                },
                "col2": {
                    "text": "${AS_MEDIUM_ROUTE_AIRCRAFT4}"
                }
            },
            "ac1row9": {
                "text": "${AS_LONGTEXT_AIRCRAFT5}"
            },
            "ac1row10": {
                "col1": {
                    "text": "${AS_SHORT_ROUTE_AIRCRAFT5}"
                },
                "col2": {
                    "text": "${AS_MEDIUM_ROUTE_AIRCRAFT5}"
                }
            }
        }
    }
}
The block defining the top 5 ADSB aircraft, note the differeing columns per row
Distributing
To include blocks with your module simply create the config and add them to the blocks folder withing the module repository. The installer will then copy the charts to the correct location within Allsky.