Startrails
A startrail image shows the apparent paths of stars across the sky over an extended period of time. It is created by combining many individual long-exposure or short-exposure images taken sequentially, typically over several hours, and stacking them so that each star’s movement forms a continuous arc.
These arcs are caused by the rotation of the Earth, which makes the stars appear to move around the celestial poles. The length of each trail corresponds to the duration of time covered by the images, while the curvature and direction of the trails depend on the camera’s orientation and the observer’s latitude.
In an Allsky context, startrails are used to: - Illustrate Earth’s rotation in a visually intuitive way
-
Summarise an entire night of observations in a single image
-
Reveal cloud interruptions, gaps in imaging, or camera downtime
-
Highlight the position of the celestial pole and overall sky coverage
-
Highlight, meteor and aircraft trails
Startrail images provide both scientific and aesthetic value, turning many hours of sky monitoring into a single, easily interpreted visual record.
Warning
Only nighttime images that are saved are included in a startrails, so if you don't save your nightime images, they won't be included.
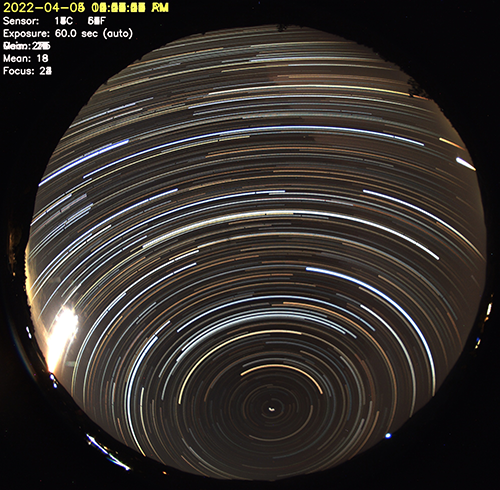
Example Startrails Image
Creating a Startrail
To have a startrails image automatically created at the end of each night, enable the Generate setting in the Startrails sub-section of the WebUI.
To manually create a startrails image run the generateForDay.sh command. For example, to create and then upload a startrails to any Allsky Website and/or remote server you have for July 10, 2025:
generateForDay.sh --startrails 20250710
generateForDay.sh --upload --startrails 20250710
This will use the settings specified in the Startrails sub-section of the WebUI.
If you want to experiment using other settings you can specify those settings as such:
generateForDay.sh --startrails 20240710 --startrails-params "--brightness 0.15 -o ~/allsky/tmp/test.jpg"
This will use a Brightness Threshold of 0.15 and put the resulting startrails in ~/allsky/tmp/test.jpg.
Make sure the parameters are enclosed in quotes.
See the Advanced section below for the possible parameters you can specify.
Advanced users: running the startrails program manually
generateForDay.sh calls the startrails program to actually create the startrails, passing it several required arguments (the underlined ones below), plus any others you add to the Startrails Extra Parameters setting.
Executing the startrails manually is possible, but not very useful.
```
Usage: startrails [-v] -i
Arguments:
-h | --help : display this message, then exit.
-v | --verbose : increase log verbosity.
-S | --statistics : print image directory statistics without producing image.
-i | --images
Example of running the startrails program manually:
cd ~/allsky/bin
  ./startrails -d images/20250710 -e jpg -b 0.15 -o images/20250710/startrails/startrails.jpg
Startrails settings
The only configuration setting for startrails is Brightness Threshold. Images have an average, or "mean" brightness level from 0.0 (pure black) to 1.0 (pure white). The default Brightness Threshold is 0.1 which is a fairly dark image, typical of a moon-less night.
Any image with an average brightness greater than the Brightness Threshold is skipped during startrails generation, so daytime images should be skipped. You need to experiment with this setting to get the best results, as allsky cameras, lenses, and sky conditions impact an image's average brightness, and hence what you use for this setting. Every time a startrails image is created a summary of brightness values is saved to the Allsky log file.
If you aren't seeing trailed stars in your images and you get a message like "No images below threshold 0.100, writing the minimum image only", your images are too bright and Brightness Threshold needs to be reduced. To determine what number to use you need to know the typical nighttime sky brightness value. Do the following:
-
Run
allsky-config get_startrails_infoto see what your brightness values are. -
If there is no data yet a message will appear with a possible reason, otherwise the output will look like:
Startrails date        Minimum   Maximum   Mean      Median    Images used   Not used  Threshold
------------------------------------------------------------------------------------------------
2025-01-17  06:20:45   0.084     0.146     0.103     0.105     250           3         0.15
2025-01-18  06:16:18   0.045     0.135     0.102     0.106     247           6         0.15
------------------------------------------------------------------------------------------------
Averages               0.065     0.140     0.103     0.106     497           9         -

1 entry not used due to invalid data.
Note
Note that the Mean brightness is determined by looking at the whole image, including any black areas. This number is likely different from the mean brightness that can be overlayed onto your images, which is determined by looking at the central portion of an image.
If you crop your image, add a mask to it, or change cameras you'll most likely need to update the Brightness Threshold setting.
- Set the Brightness Threshold to the Maximum, or slightly below it. If you have an Averages line, use its Maximum.
You'll now create a startrails and if needed, change Brightness Threshold, then create another startrails, change the setting, etc.
-
To make startrails generation MUCH faster, do it using a small number of images.
-
Create a temporary directory to hold some nighttime images:
mkdir ~/allsky/images/test. -
cd ~/allsky/images/DATE, replacing DATE with the date of a non-working startrails. -
Using the timestamp of each image, move a few hours of nighttime images to the ~/allsky/images/test directory:
-
If you are running SAMBA (
allsky-config samba) you can view the files from your PC or Mac and then select some files with the mouse and drag to the test directory. -
If you are not running SAMBA and you are logged into the Pi desktop, open a "File Manager" window on the Pi and drag/drop the files.
-
If neither of the above work for you, you'll need to use the mv command to move the files. Using the * wildcard in the file names will allow you to move multiple files at a time.
For example:
mv 2025071001* ../testto move all the images taken from 1:00 AM to 1:59 AM. -
-
Run ``generateForDay.sh --startrails test``` to create a startrails file in the test directory. Look at the image using the Images page in the WebUI. Also look at the Images used and Not used columns of the output.
-
As needed, adjust Brightness Threshold and re-run
generateForDay.sh. -
When done, move all the images from the allsky/images/test directory back to allsky/images/DATE.
-
Remove the temporary directory:
rmdir ~/allsky/images/test. -
Now, create the final startrails:
-
generateForDay.sh --startrails DATE -
If you want to upload the file you just created, see the note generated by
generateForDay.sh.
-
Troubleshooting
Info
It's extremely rare that a startrails image isn't created at all. It's much more common that an image is created but none of the stars have trails. If none of the stars have trails, see the Startrails settings section above.
Warning
The resolution of all images must be identical; if not, only images with the same resolution as the FIRST image are used.
This can happen if the daytime and nighttime Binning settings are not the same, or any day you change the Image Resize and/or Image Crop settings.
-
If a startrails image isn't being created, make sure the Startrails Generate setting is enabled. If it IS enabled, run:
generateForDay.sh --startrails DATEreplacing DATE with a valid date like 20250710 and check for errors.
-
If a startrails image is created but not uploaded, make sure the Startrails Upload setting is enabled. If that IS enabled, run:
generateForDay.sh --upload --debug --startrails DATEand check for errors. If needed, run testUpload.sh to see why the upload fails.