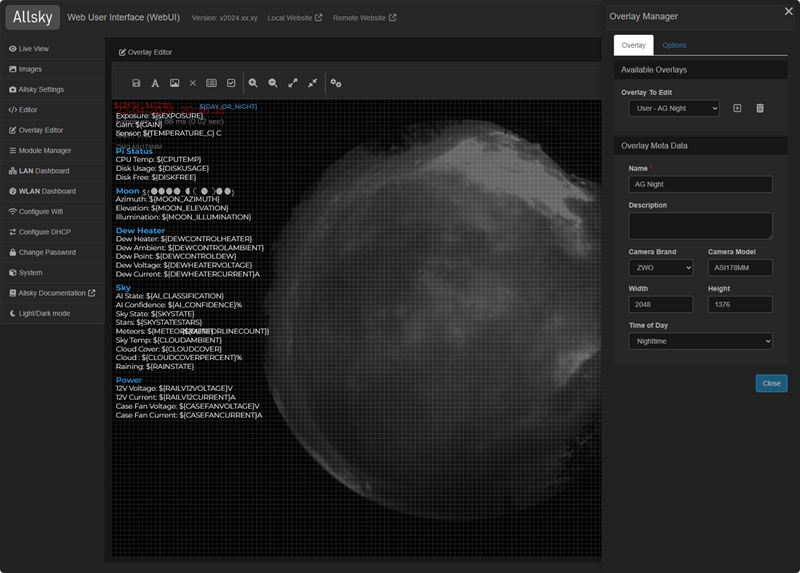
Editor Interface
The Overlay Editor web page consists of two key areas:
- The toolbar contains icons that perform actions or bring up dialog boxes.
- The working area contains the overlay and the current image in the background.
NOTE: The Overlay Editor will only start if Allsky is capturing images. If Allsky is not capturing a warning is displayed and the Overlay Editor will wait until Allsky start capturing.
New fields are initially added to the upper left corner of the overlay but can be moved anywhere you want - just drag and drop! If you added a field by mistake, delete it by clicking on the icon (4) before doing anything else.

The Overlay Editor toolbar
| Number | Function | Description |
|---|---|---|
| 1 | Save The Current Configuration | This is enabled and turns green when any changes have been made that require saving. The word "Modified" is also appended to the tab label, i.e., "Overlay Editor - Modified". |
| 2 | Add New Text Field | Click to add a new field with text and/or variables to the overlay, including adding a variable |
| 3 | Add New Image Field | Click to add an existing image to the overlay. The image must have previously been uploaded using the Image Manager. |
| 4 | Delete selcted field | Click to delete the selected field. The "del" or "delete" keys on the keyboard can also be used. The icon is only enable turns green when a field is selected. |
| 5 | Variable manager | Click to add a pre-defined field from the Variable Manager. See the Variable Manager section for more details. |
| 6 | Preview | Click to preview each of the fields. This is useful to see what actual data will look like on the overlay so you can better align fields. |
| 7 | Group Fields | Groups the selected fields |
| 8 | Un Group Fields | Ungroups the selected group |
| 9 | Left Align | Lest aligns the selected fields |
| 10 | Equal Vertical Space | Equally distributes the selected fields between the first and last selected fields |
| 11 | Equal Horizontal Space | Equally distributes the selected fields between the first and last selected fields |
| 12 | Zoom In | Zooms into the overlay |
| 13 | Zoom Out | Zooms out of the overlay |
| 14 | Full Size | Views the overlay at full resolution |
| 15 | Fit | Fits the overlay into the screen |
| 16 | Overlay Manager | Displays the Overlay Manager |
| 17 | Overlay Errors | Only displayed if any fields are detected that are off the screen. Selecting this icon will display the Overlay Errors dialog allowing the off-screen fields to be deleted or fixed. Fixing the field will move it into the visible portion of the overlay editor allowing you to move it to the exact position required. |
| 18 | Font Manageer | Displays the Font Manager |
| 19 | Image Manager | Displays the Image Manager |
| 20 | Settings | Displays the Overlay Settings |
| 21 | Help | Displays the overlay manager help |
Keyboard/Mouse
There are various keyboard and mouse shortcuts used by the overlay manager
- The Del or Delete key will delete a field if one is selected
- A single mouse click will select the field
- Double clikcing a field will display its properties
- Once the properties window is visible clicking a field will switch to that fields properties
- Clicking the mouse and dragging around fields will select all of the fields
- Holding the alt key and dragging will draw a rectange
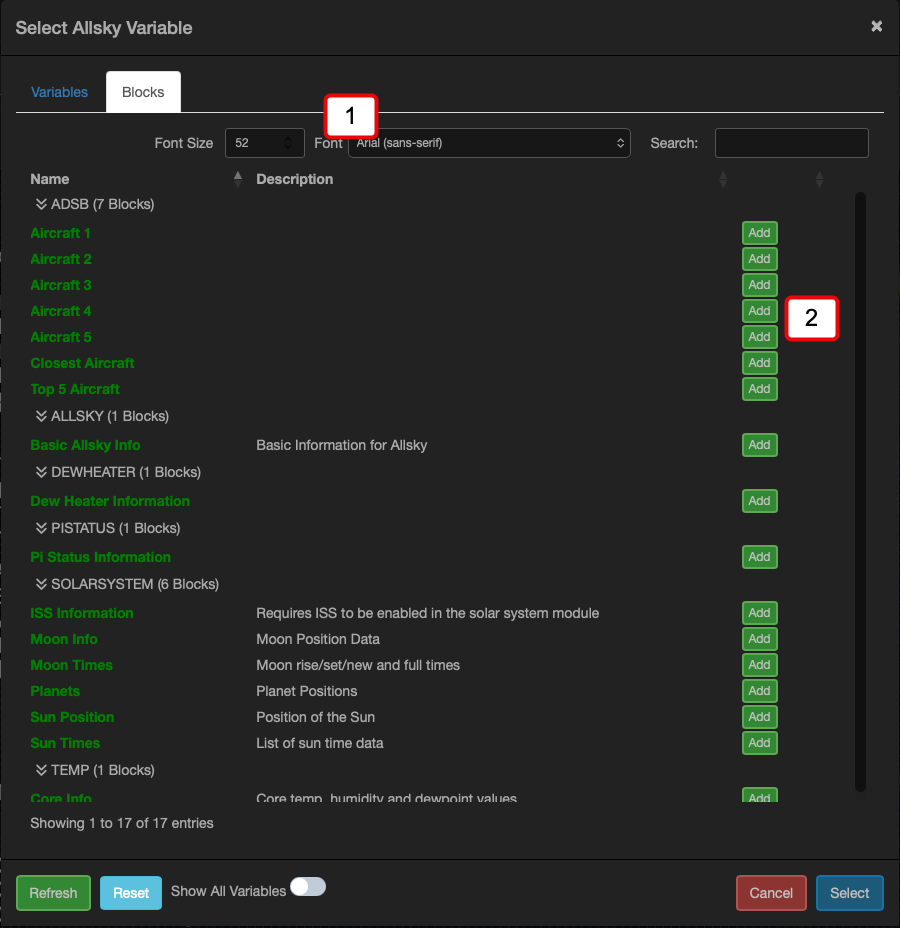
Variable Manager
The variable manager allows you to select variables and add them to overlays as a field. I also allows block of fields to be added

The Variable Manager Dialog
- Allows the columns displayed in the variable manager to be selected
- The available variables that can be added
- Display all variables, by default oly variables with a value are displayed
To add a variable either double click it or single click it and click the 'Select' button
The Variable Manager Blocks Dialog
This dialog allows blocks to be added to the overlay, blocks are a collection of fields in a predefined layout.
- Select he font details for the block. NOTE This must be selected BEFORE adding the block
- Click the add button to add the block
Overlay Manager
The Overlay Manager is used to create and enable overlays for day and nighttime capture.
The Overlay Manager
The Overlay Manager comes pre installed with several overlays for common cameras. The Allsky team maintain these overlays. During installation the most appropriate overlay for your camera will have been selected, the Overlay Manager allows you to use these overlays or create a new one.
The Allsky maintained overlays cannot be edited, you must create a new overlay if you wish to edit it. The new overlay can be copied from any exising overlay.
During an upgrade from a previous version of Allsky the Module Manager will attempt to convert any of your customised overlays into the module manager format.
Main Tab
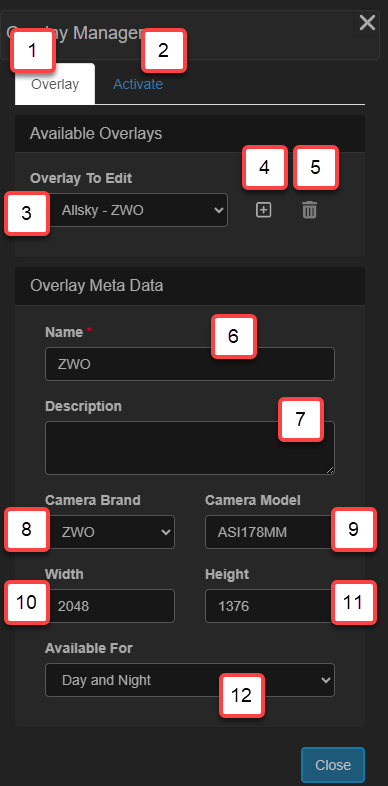
Field Details
- Selects the main overlay manager tab
- Displays the tab to allow overlays to be activated
- Selects the overlay to display/edit. When selecting an overlay the overlay will be displayed in the main overlay editor. If you select an overlay that cannot be edited then a warning is displayed in the main overlay editor.
- Adds a new overlay
- Deletes an overlay. NOTE: Allsky maintained overlays cannot be deleted
- The name of the overlay, this is used to identify the overlay in a human readable format
- The name of the overlay description
- The camera brand the overlay applies to
- The camera model the overlay applies to
- The width of the captured image, after any cropping
- The height of the captured image, after any cropping
- The Time of Day the overlay should be used for
When making any changes in the overlay meta data section you must use the main save button on the Overlay Editor toolbar, this will be highlighted in green if there are any changes to save
Options Tab
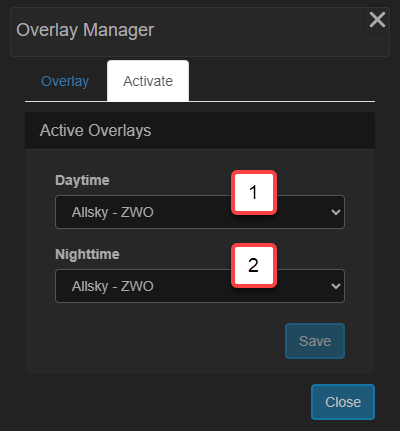
Field Details
- Selects the overlay to use when capturing daytime images
- Selects the overlay to use when capturing nightime images
Selecting Overlays
To select the overlays to use for day or night open the Overlay Manager and switch to the Options Tab. Here you can select the appropriate overlay to use.
Overlays can be limited to daytime, nighttime capture or both. Only the available overlays for day / nighttime capture will be displayed in the drop downs
Create New Overlay
To create a new overlay click the + icon (4). A new dialog will be displayed allowing you to create the new overlay.
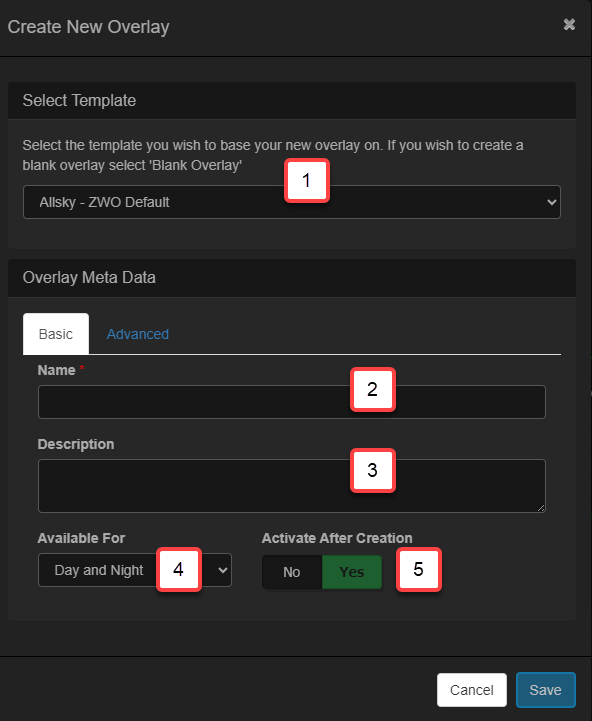
Add new overlay main tab
- Selects the overlay you wish to use as a starting point or select 'Blank Overlay' for an empty overlay
- Enter a Human Readable name for the overlay
- Enter a Human Readable name for the overlay
- Select the time of day you wish this overlay to be used in
- If selected then the overlay will be activated after it has been created. If not selected the overlay will be saved as a draft and you will have to manually activate it.
By default when an overlay is created it is activated for day/night or both as defined by the 'Available For' dropdown. If you DO NOT want the overlay to be activated by default then select 'No' in the 'Activate After Creation' option.
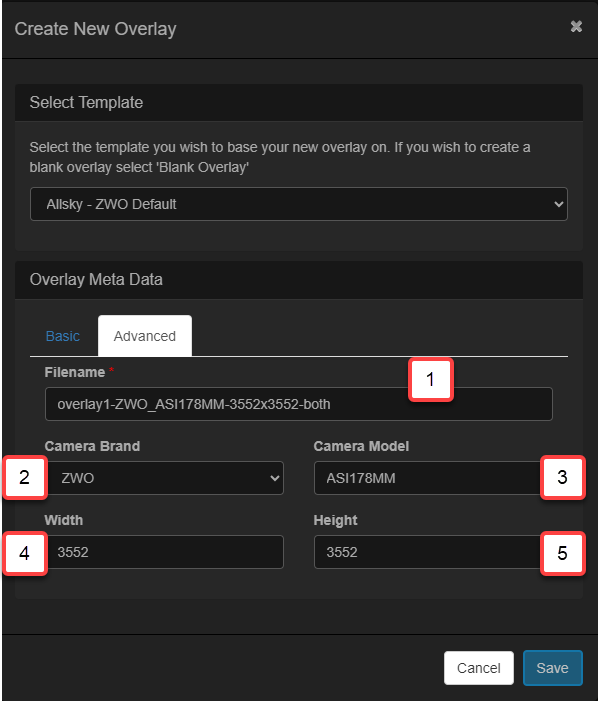
Add new overlay advanced tab
You will only need to make changes on this tab if you are creating an empty overlay. If you are copying an existing overlay then all of the fields will be defaulted from the copied overlay.
- This is for information only and is the filename of the overlay that will be used to store it on the Pi
- The camera brand the overlay applies to
- The camera model the overlay applies to
- The width of image the overlay applies to. This will default to the width of the last captured image
- The height of image the overlay applies to. This will default to the width of the last captured image
Once you have completed the required fields in the dialog select the 'Ok' button and the new overlay will be displayed allowing you to edit it.
Delete Overlay
To delete an overlay select the required overlay and click the delete buttton.
NOTE: You cannot delete an overlay if it is currenty active. You must activate another overlay before deleting it.
Overlay Errors
Font Manager
The Font Manager allows you to manage fonts used in overlays. It supports all mainstream browser fonts and allows you to upload any TrueType font for use in text fields. You only need to use the Font Manager if you intend to use any non built in fonts.
In version 2024.12.06_06 and before you were required to add fonts to the overlay in the Fonat Manager before they could be used. This is no longer a requirement and the fonts used in an overlay are automatically managed
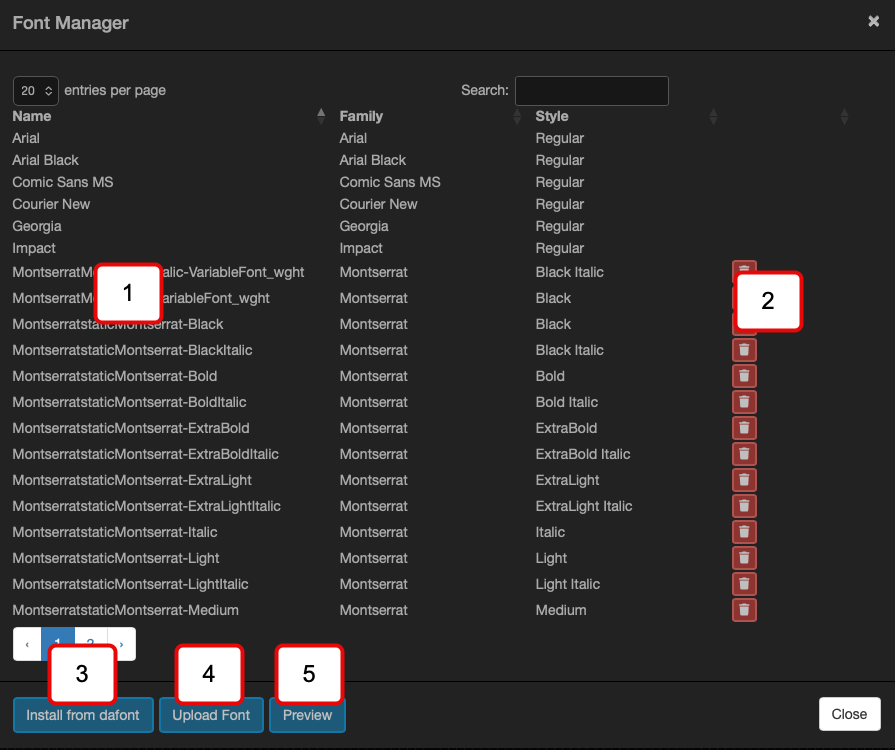
The Font Manager Dialog
- Lists all the fonts that can be used. System Fonts are marked as such in the Path column.
- Deletes a font.
- Adds a font from daFont.com by entering a URL. See below.
- Uploads a zip file to install fonts. See below.
- It is not possible to delete a System Font and they will not have a delete icon as shown for the first several fonts above.
- If a font is in use when deleted then any fields using the font will revert to the default font as specified in the overlay settings.
Font Preview
The Font Preview dialog allows you to preview any installed font, including system fonts.
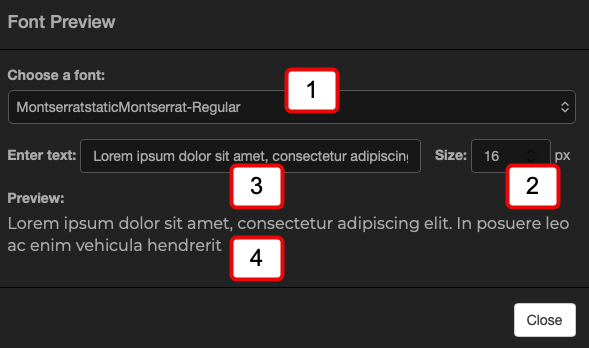
The Font Manager Preview Dialog
- Selects the font you wish to preview
- Select the font size for the preview
- Enter some text to preview
- The previewd text
Image Manager
The Image Manager allows you to upload images for use on overlays and create masks for certain functions such as star and meteor detection. Allsky comes with several basic images.
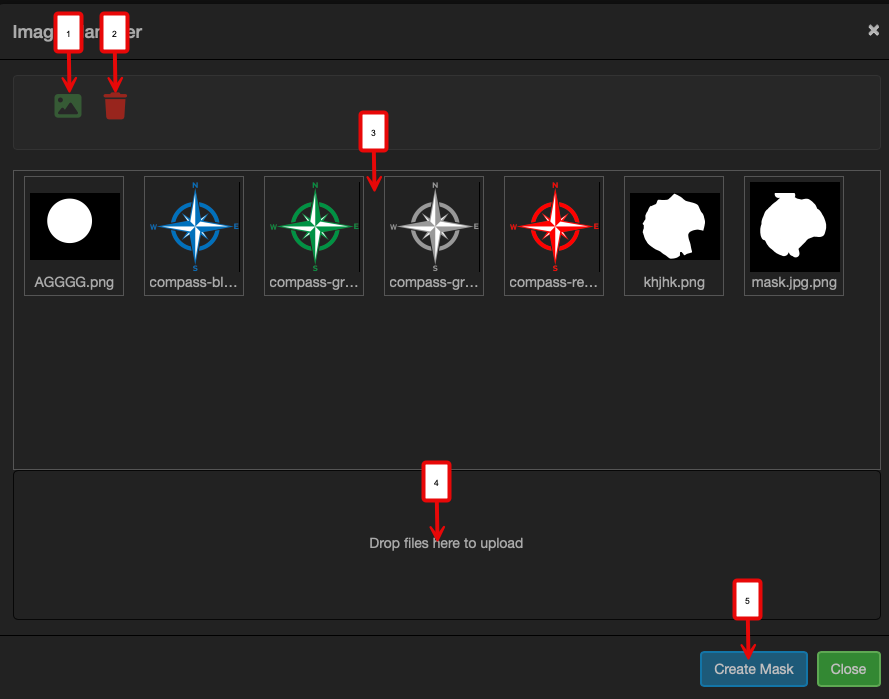
The Image Manager Dialog
- Adds the selected image to the overlay
- Deleted the selected image
- The image library
- Area to drop images onto to upload them, clicking this area will present an upload dialog
- Starts the Mask Editor
The Mask Editor
Some modules with Allsky benefit from having a mask applied to them prior to running the module. The Starcount module us a good example of this. To prevent false positives a mask is applied that removes the areas of the image you are not interested in counting stars in.
Masks can also be used to mask out areas outside of the image circle thay mak have light leaks. This give syou a nice dark area to place th eoverlays on.
Masks consist of two colours
- Black - Any black areas will be masked out of the image i.e. set to black
- White - Any white areas will be preserved
For more complex masks its possible to blend the black to white transisiotn in the mask to prevent false positives in modules that may be looking for edges such as the Meteor detection module.
The Mask Editor has two modes, Easy and Expert, the default is Easy mode. In Easy mode all you do is draw a white ellipse to capture the areas you wish to keep, when you ssave the mask the bacl areas will be automatically added. In Expert mode you have a series of drawing tools you can use to create much more detailed masks including blended edges on shapes to help with false positives on edge detection.
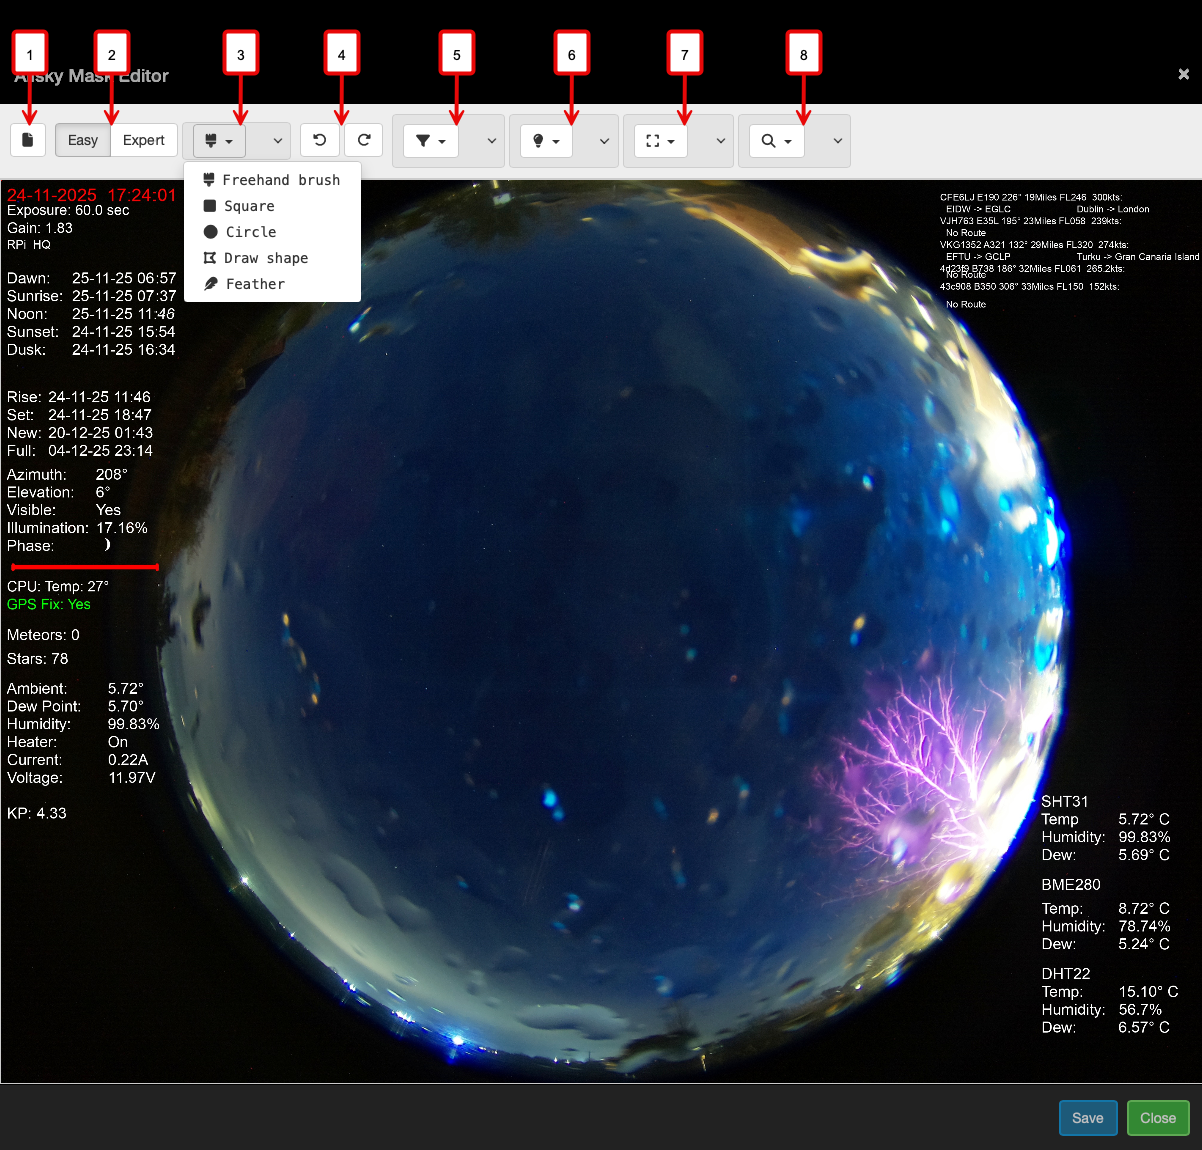
The Mask Editor Dialog
- Start creating a new mask
- Switch between easy and export mode
- In Expert mode select the type of drawing tool to use
- Undo and Redo buttons
- Sets the opactity of the mask being created, useful for fine details work where you need to see thru the mask
- Set the brightnedd of the background image
- For the brush tool set the thickness of the brush
- Zoom controls
Once you are happy with the mask click the 'Save' button and you will be prompted to give the mask a name and it will then be saved. There are a few rules around names
- The name must be unique to all other images
- Do not use spaces in the name
Other ways to create masks
You can create a mask in any drawing application, shuch as Gimp or Photoshop. To do so create a Mono image and paint areas you wanto to keep white and those you want to mask black
Tip
When creating a mask turn off all modules that may add to the image, overlays etc to ensure you have a clean image to create the mask with
Overlay Settings
The overlay Editor has three tabs for settings
- Overlay Settings Settings that affect new fields added to an Overlay
- Editor Settings Settings that apply the the Overlay Editor
- Overlays - Available overlays to edit
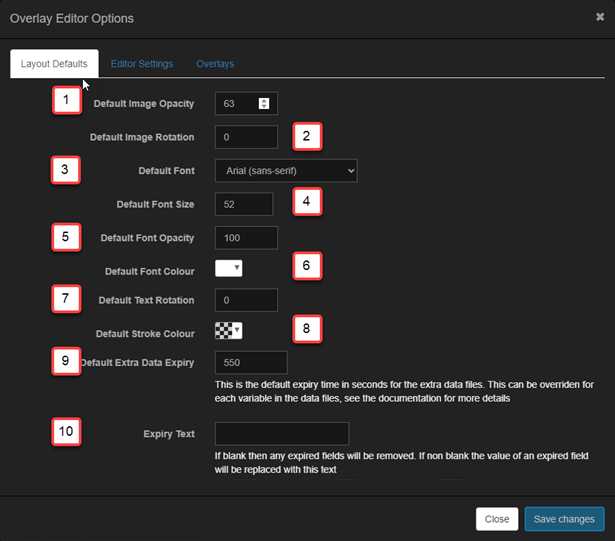
The Overlay Settings
- The default opacity for new images.
- The default rotation for new images.
- The default font for new text fields.
- The default font size for new text fields.
- The default font opacity for new text fields.
- The default font color for new text fields.
- The default rotation for new text fields.
- The default colour used for the font stroke.
- The default expiration time in seconds for "extra" data files that do not specify an expiry time. This applies to all variables in .txt files and entries in .json files that don't have an "expires" attribute.
- The default text used when a field has expired.
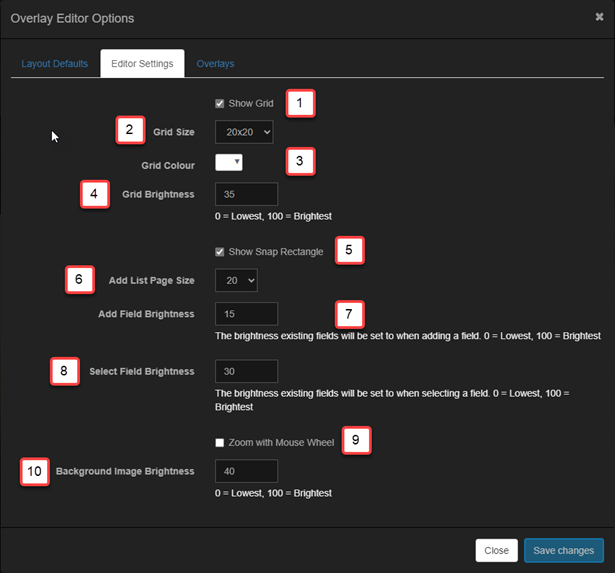
The Overlay Editor Settings
- When enabled, displays a grid for easier alignment of fields on the overlay. The grid is used to 'snap' fields making their placement easier.
- The size of the grid in pixels. NOTE Changing the grid size on an existin glayout will not adjust any fields
- The colour to use for the grid.
- The grid brightness. Values range from 0 (lowest brightness) to 100 (brightest).
- When enabled, moving a field will cause a rectangle to be displayed showing where the field will snap to if dropped.
- The number of variables to show per page in the Variable Manager.
- When adding a new field all other fields will be set to this brightness to make the new field easier to see. Values range from 0 (darkest) to 100 (each field's full brightness).
- When selecting a field all other fields will be set to this opacity to make the new field easier to see. Values range from 0 (darkest) to 100 (each field's full brightness).
- When enabled, scrolling the mouse wheel will zoom the overlay.
- Brightness of the captured image being overlayed. Lower this if the captured image is bright to make it easier to see the overlay fields. Values range from 0 (black background) to 100 (full brightness of captured image).
When changing the brightness settings you may need to click somewhere in the overlay in order for the change to take affect.
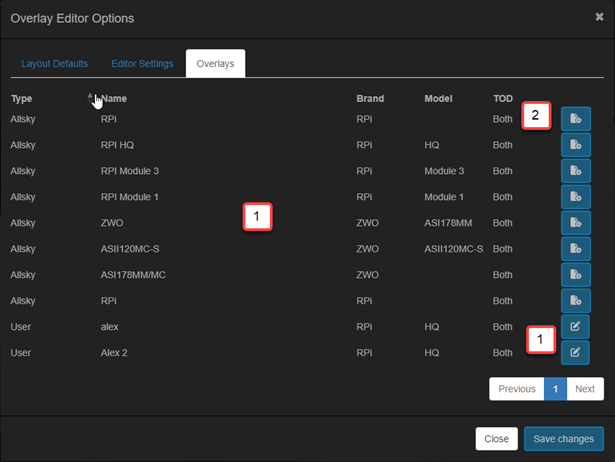
The Overlay Editor Overlays
- Displays a table showing all of the overlays available.
- This icon is displayed when the overlay is not editable, these are overlays provided by the Allsky team. Clicking the button will view the overlay but not allow it to be edited
- This icon is displayed when the overlay is editable. Clicking the button will view the overlay and allow it to be edited