Environment
This module reads a variety of external sensors to provide temperature, humidity and dewpoint information for the overlays and other modules.
The module can read upto 4 sensors
- Core - This is used to provide data to overlays and other Allsky modules
- Sensor 1 - 3 - These can be used for any purpose, for example you may have a temperature sensor insode the dome and one external. These sensors can alos be used to drive a GPIO pin
Settings
The following settings are available in the module
Home Tab
The settings on this tab control how the module gets its temeprature and humidity data
| Setting | Description |
|---|---|
| Delay | The number of seconds between reading the sensors, 0 switches this off and the sensor is read every time the module runs |
| Units | The unit of measure used |
Core Tab
This sensor is used for providing environment data to other Allsky modules, it can also be used on overlays
See the Sensor Fields Section for details of each sensor that can be used
Sensor Fields
-
I2C Sensors
These are sensors that connect to the I2C bus on the Pi. There are numerous sensors available. If you find a sensor that is not supported then please raise a discussion thread in the Allsky Github repository and we will look at implement it.
Enable The I2C Interface
Before using any I2C devices you must enable the I2C interface using the raspi-config utility. To enable the interface run raspi-config and navigate to Interface Options->I²C and enable the interface. You may need to reboot the pi before the interface works
Select the required I2C sensor to view its details
Sensirion Temperature/Humidity sensors are some of the finest & highest-accuracy devices you can get. And, finally we have some that have a true I2C interface for easy reading. The SHT31-D sensor has an excellent ±2% relative humidity and ±0.3°C accuracy for most uses. Adafruit documentation
The following settings are available for this sensor
I2C details
The default address for the SHT31 is 0x44 but by connecting the addr pin to +ve this can be changed to 0x45
Settings
Setting Description Sensor Name The name of the sensor, this will be available for use in overlays I2C address The I2C address of the sensor Enable Heater Enables the inbuilt heater in the sht31 Schematic

Tip
If you are going to connect multiple I2C devices to the pi then it is strongly suggested you use something like the Gravity I2C hub to make connections easier
Sensirion Temperature/Humidity sensors are some of the finest & highest-accuracy devices you can get. The SHT41 sensor is the fourth generation of I2C temperature and humidity sensor from Sen sirion. (They started at the SHT10 and worked its way up to the top!). The SHT41 has an excellent ±1.8% typical relative humidity accuracy from 25 to 75% and ±0.2 °C typical accuracy from 0 to 75 °C. Adafruit documentation
The following settings are available for this sensor
I2C details
The default address for the SHT31 is 0x44 but in some rare cases, like the SHT4x-BD1B, 0x45 is used
Settings
Setting Description Sensor Name The name of the sensor, this will be available for use in overlays I2C address The I2C address of the sensor Heater Mode Selected the heater mode for the sensor Schematic

Tip
If you are going to connect multiple I2C devices to the pi then it is strongly suggested you use something like the Gravity I2C hub to make connections easier
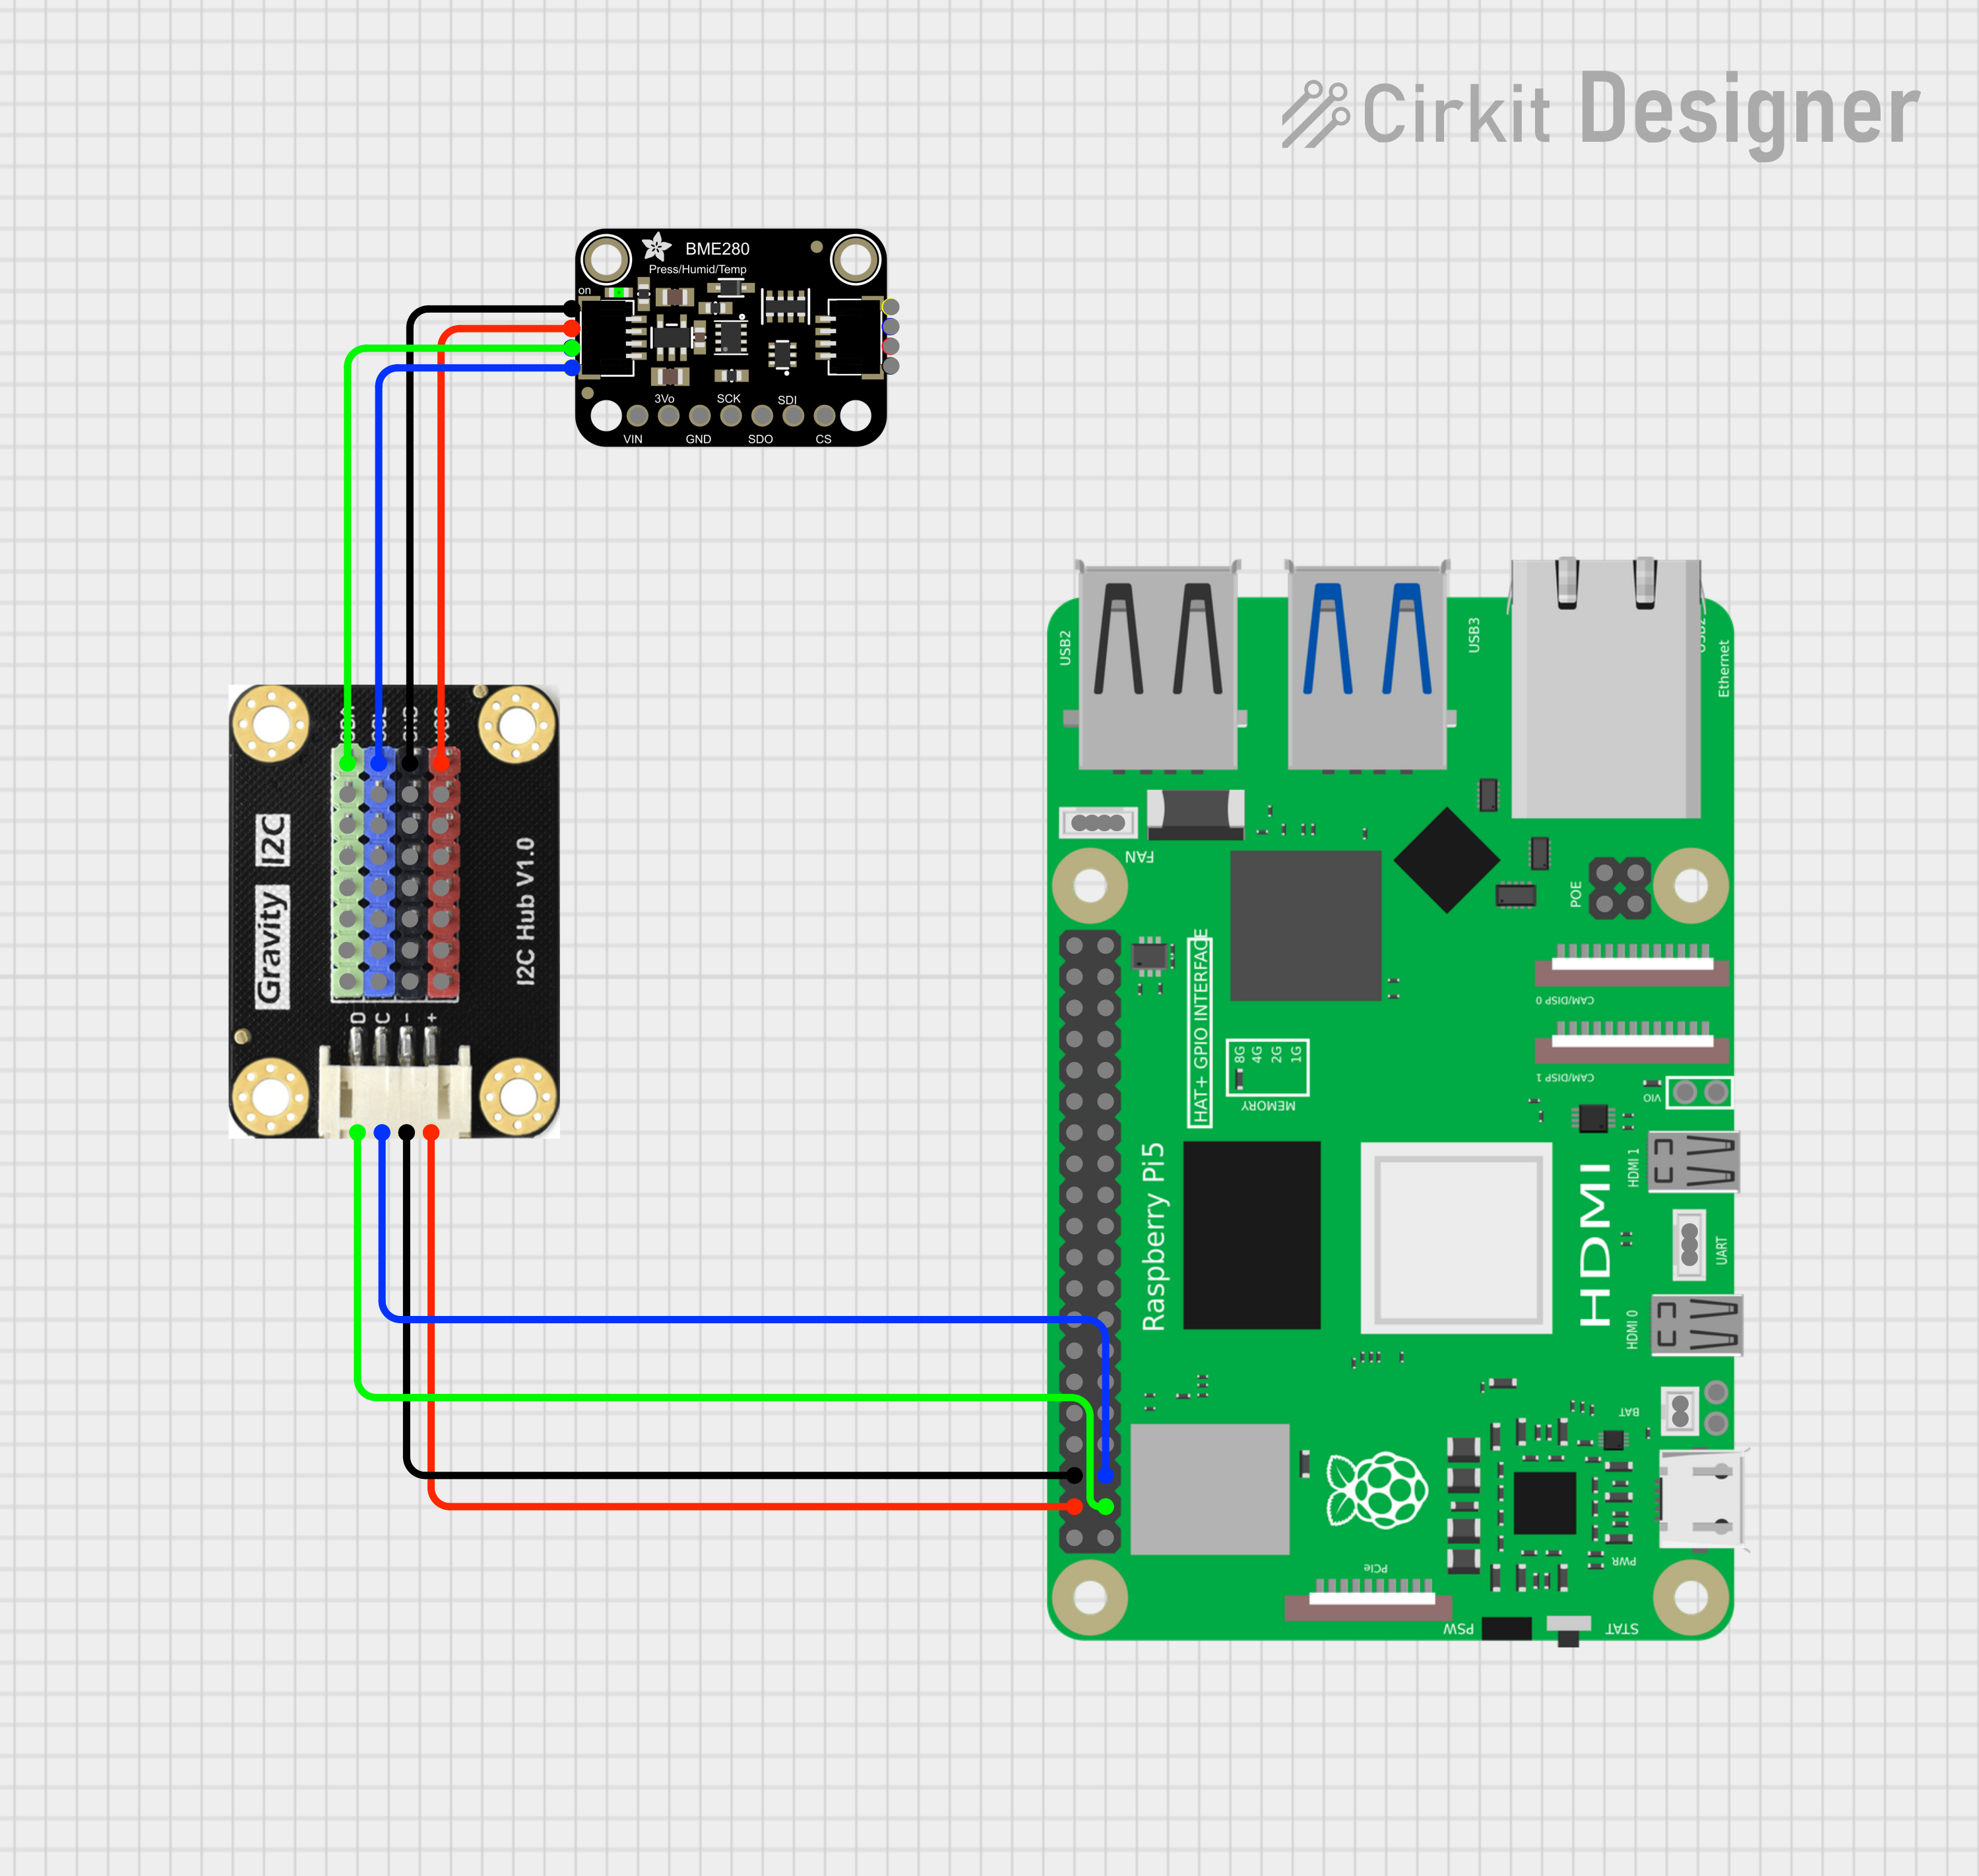
The BME280 is an environmental sensor module that measures temperature, humidity, and barometric pressure in a single, compact package. It is widely used in projects for weather forecasting, home automation, and IoT, and is compatible with many microcontrollers like Arduino, Raspberry Pi, and ESP32 through its I2C or SPI interfaces. Adafruit Documentation
The BMP280
Do not use a BMP280. The main difference between the BMP280 and BME280 is that the BMP280 measures temperature and pressure, while the BME280 measures temperature, pressure, and humidity. The BME280 is a more comprehensive environmental sensor, while the BMP280 is a simpler, lower-cost barometer and thermometer.
I2C details
The BME280 has two possible I2C addresses: (0x77) (default) or (0x76). The address is determined by the logic level on the SDO (or ADDR) pin. Connecting the SDO pin to ground (GND) sets the address to (0x76), while leaving it disconnected or connected to a high logic level (like VCC, depending on the specific board) leaves it at the default of (0x77)
Settings
Setting Description Sensor Name The name of the sensor, this will be available for use in overlays I2C address The I2C address of the sensor Schematic
The BME680 is a digital 4-in-1 environmental sensor that measures barometric pressure, ambient temperature, relative humidity, and air quality (gas). Adafruit Documentation
I2C details
The BME680 has two possible I2C addresses: (0x77) (default) or (0x76). The address is determined by the state of the SDO pin. Connecting SDO to GND sets the address to (0x76), while connecting it to VDD sets the address to the default of (0x77).
Settings
Setting Description Sensor Name The name of the sensor, this will be available for use in overlays I2C address The I2C address of the sensor Schematic
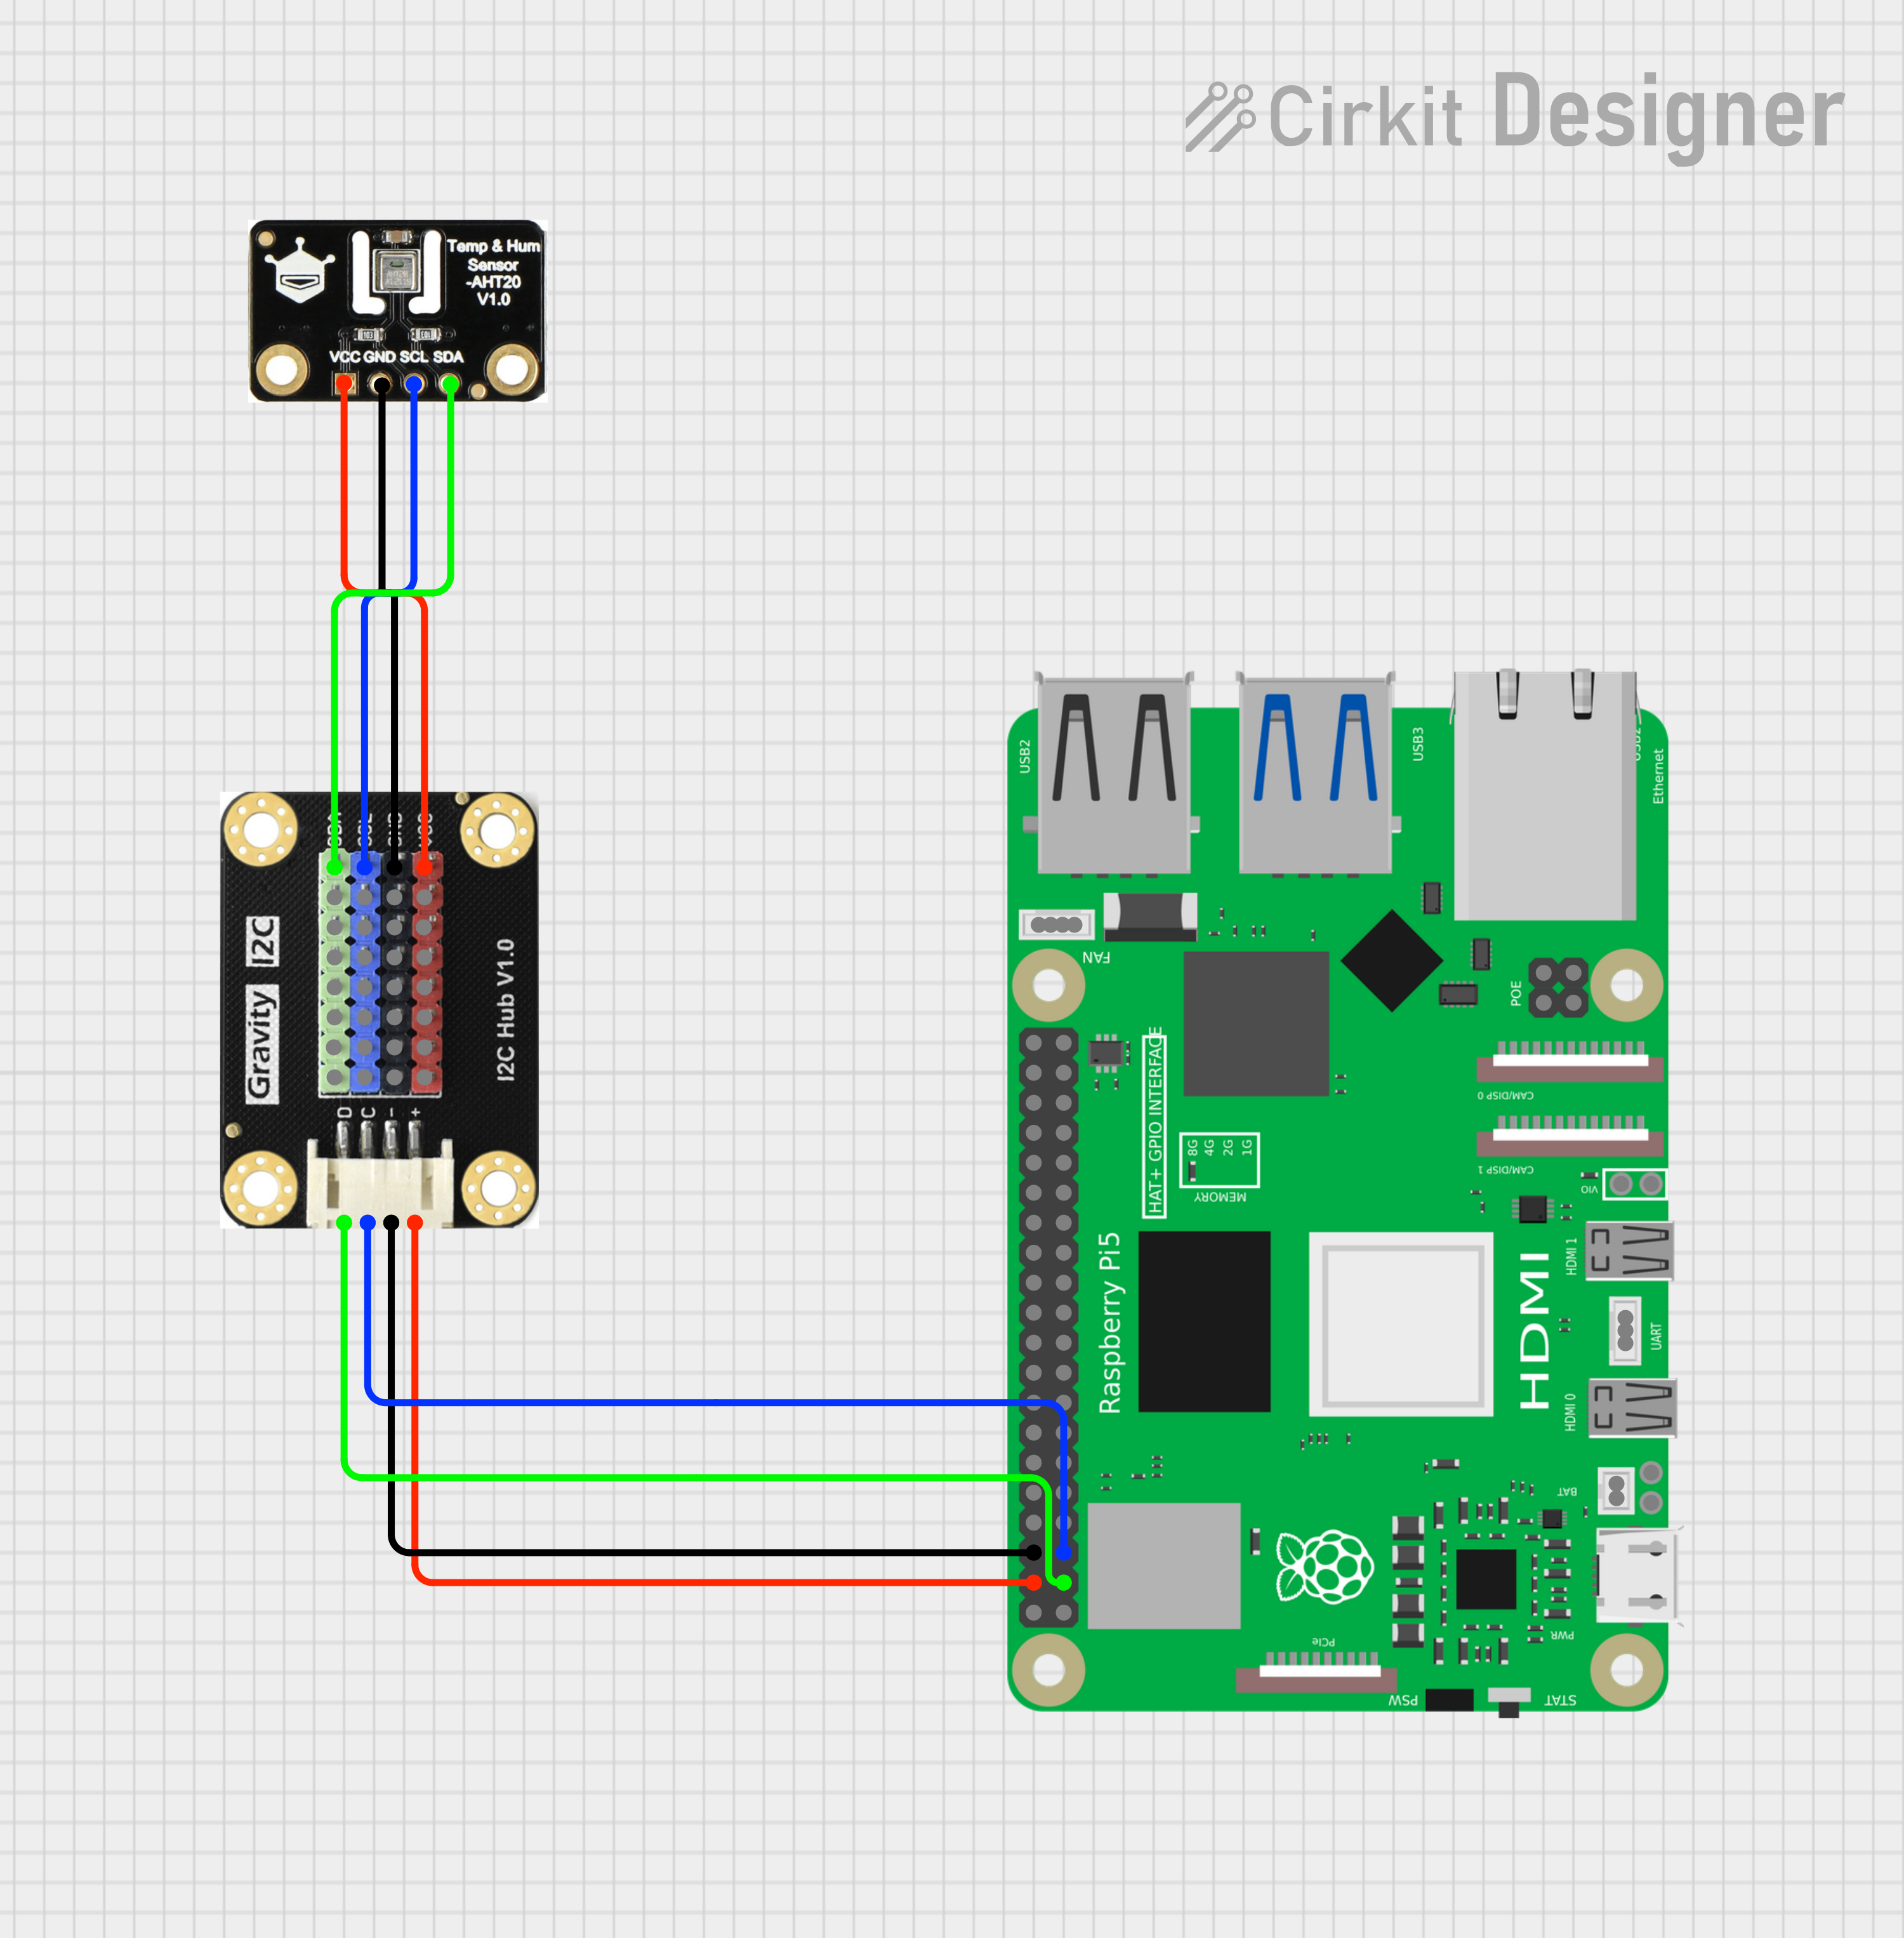
The HTU21D is a digital, low-cost sensor that measures both humidity and temperature, providing calibrated and linearized signals via I2C. Adafruit Documentation
I2C details The I2C address for the HTU21 is 0x40 and cannot be changed
Setting Description Sensor Name The name of the sensor, this will be available for use in overlays I2C address The I2C address of the sensor Schematic

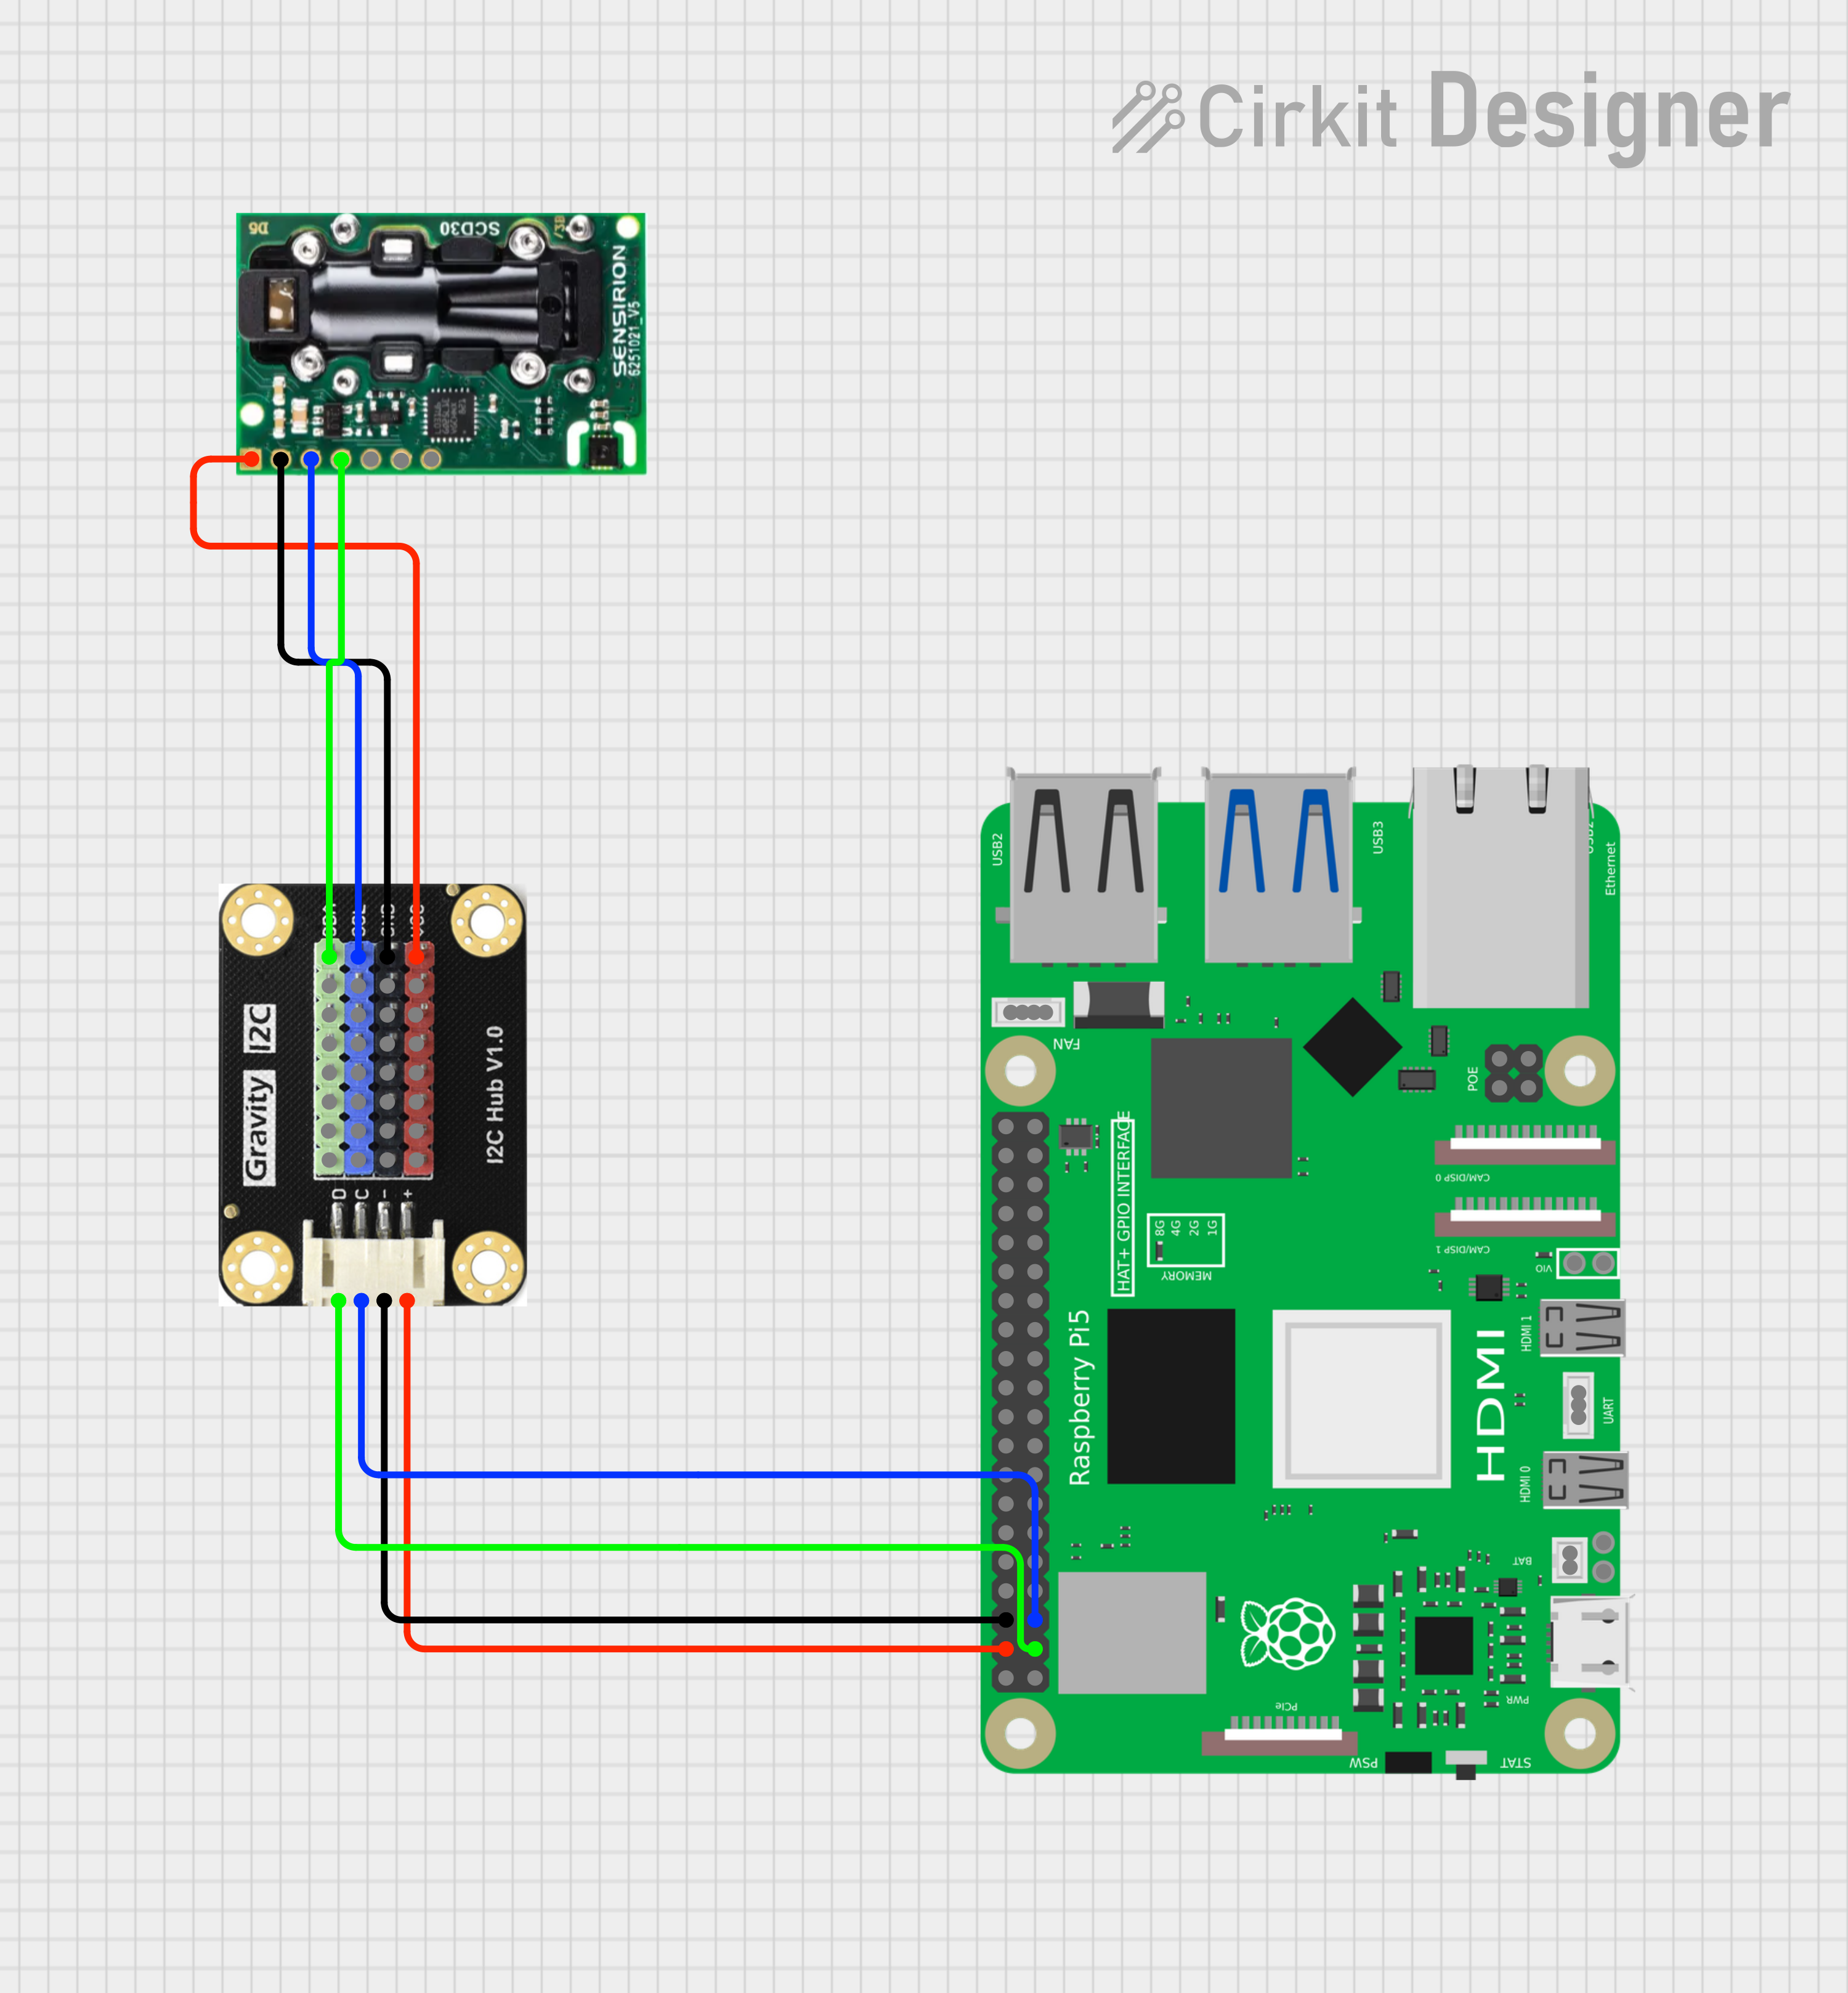
The AHT10 and AHT20 are compact, high-precision digital temperature and humidity sensors that uses the I2C protocol. Adafruit Documentation
I2C details
The default I2C address for the AHTx0 sensor (including the AHT10 and AHT20) is 0x38. This address is fixed and cannot be changed directly on the sensor itself,
Settings
Setting Description Sensor Name The name of the sensor, this will be available for use in overlays I2C address The I2C address of the sensor Schematic
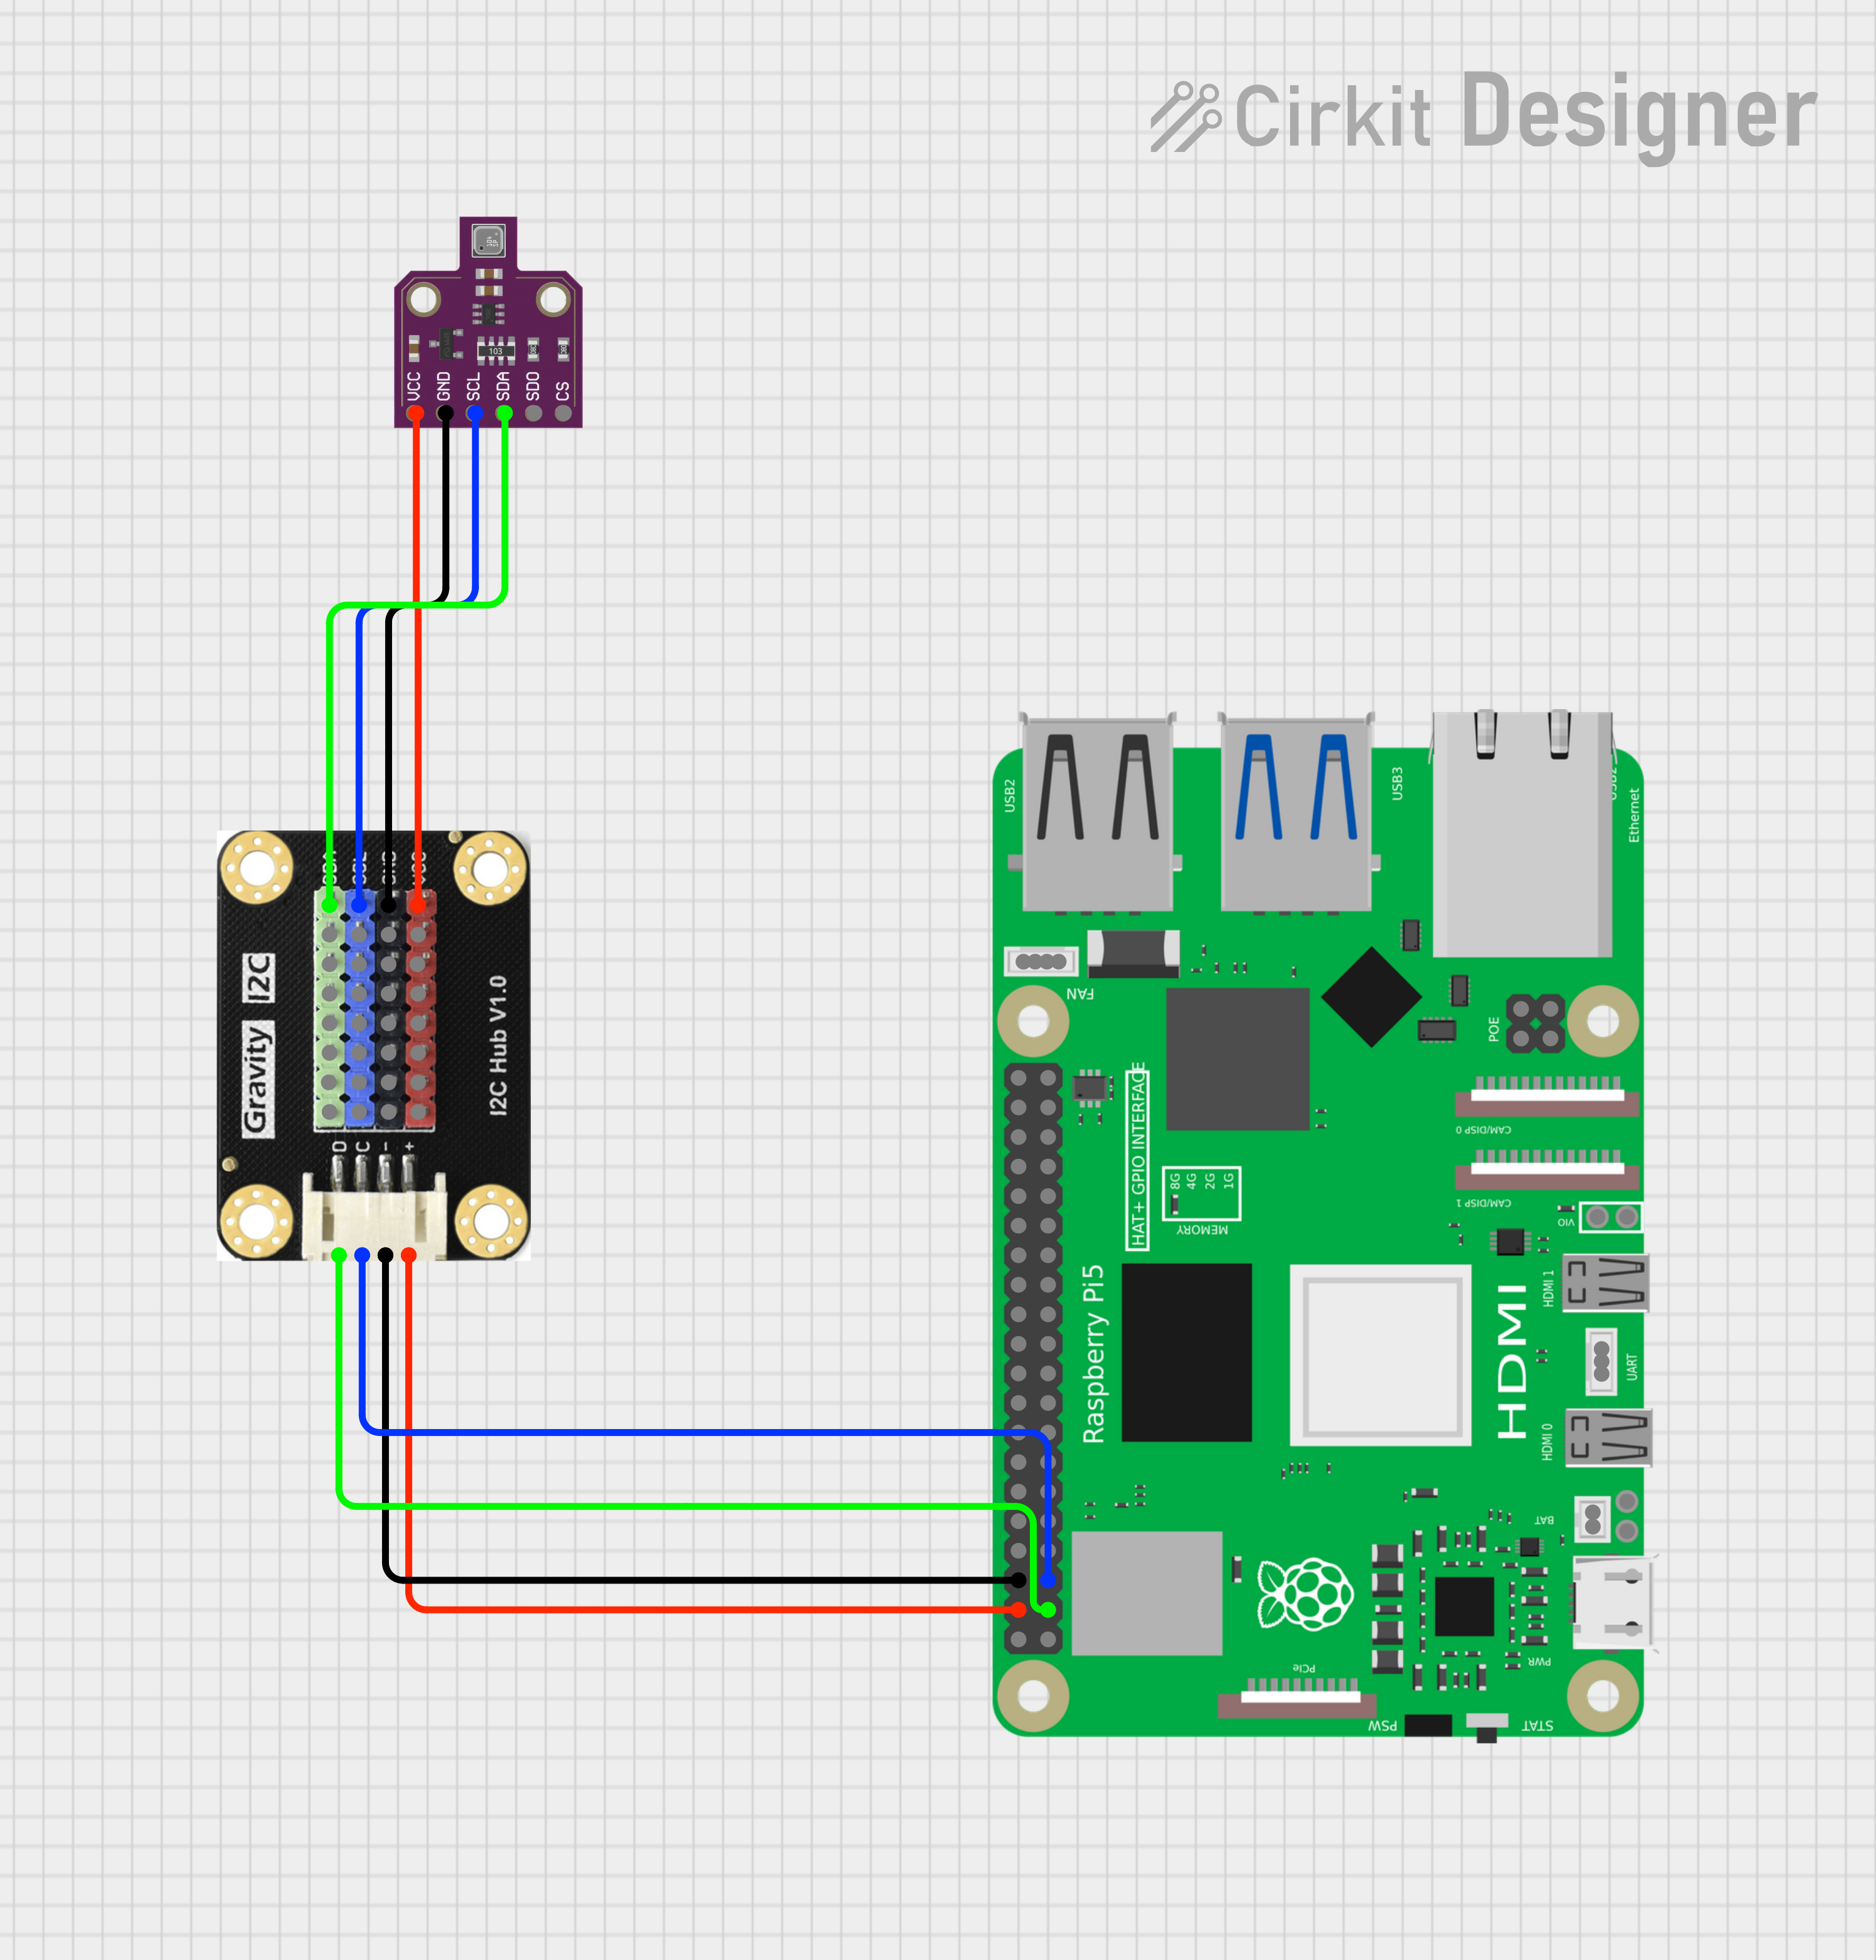
The SCD30 is a sensor module from Sensirion that measures carbon dioxide (CO2), temperature, and humidity using Non-Dispersive Infrared (NDIR) technology. It is designed for applications like HVAC systems, air purifiers, and indoor air quality monitoring, providing accurate and stable measurements with an integrated temperature and humidity sensor that compensates for external heat sources. Adafruit Documentation
I2C details
The default I2C address for the SCD30 sensor is 0x61. This address is set after the sensor powers up and is used for communication with the sensor using I2C
Settings
Setting Description Sensor Name The name of the sensor, this will be available for use in overlays I2C address The I2C address of the sensor Schematic
-
API Based Sensors
OpenWeather provides reliable, easy-to-use weather products, supporting millions of developers around the clock. Its solutions are designed to fit a wide range of applications, from simple projects to complex enterprise systems.
Openweather module
Do not use this function and the OpenWeather API module as well. If you are using this function then please remove the OpenWeather Module as both create the same overlay data
API Keys
This module requires an API key before you can request data from the OpenWeather map API. To obtain a key create and account on the https://openweathermap.org
After you have created an accoutn and logged in navigate to the 'API Keys' page and generate an API key. This key is then used in the settings
Location
When the module calls the OPenWeather map API it uses the latitude and longitude specified in the main Allsky settings for your location.
Settings
Setting Description Sensor Name The name of the sensor, this will be available for use in overlays API Key Your API key for Openweather Filename The name of the file to write the extra data to Read Every How freuently to read the data. See notes below on API limits Expiry Time How long to keep the data from the API Rate Limits
The API provides for 1,000 free calls per 24 hours. So do not request data more frequently than every 87 seconds or you will run out of credits
Ecowitt is a brand that provides modular weather and environmental monitoring equipment, including automatic weather stations, sensors, and data integration platforms. Its products can measure various parameters like temperature, rain, wind, soil moisture, and air quality. The systems typically use a gateway to connect wirelessly to the internet, allowing data to be viewed via a mobile app or website, and can integrate with other platforms like. The available hardware can be found on the Ecowitt website
Hardware Requirements
To use this module you will need to have some Ecowitt hardware with data being shared. Visit the Ecowitt website to view the available hardware. The hardware is also available from other resellers such as Amazon
Settings
Setting Description Application Key The application key from the Ecowitt dashboard API Key The API key from the Ecowitt dashboard MAC Address The MAC address of your hardware. This can be found on the Ecowitt dashboard This is a special version of the Ecowitt integration that talks to your local Ecowitt hub to obtain the weather data.
Experimental
This sensor is still experimental and has only been tested with a very limited set of Ecowitt hardware and hibs
Settings
Setting Description Sensor Name The name of the sensor, this will be available for use in overlays Local URL The local URL of your Ecowitt hub. This is JUST the IP address This sensor allows you to read any sensor from a Home Assistant (HASS) installation to obtain the temeperature and humidity.
Home Assistant Setup
The setting up of home assistant is beyond the scope of this document. This documentation assumes you are familiar with Home Assistant
Settings
Setting Description Sensor Name The name of the sensor, this will be available for use in overlays URL The URl of the Home Assistant installation including the port number Long Term Token The Long Term Token (LTT) you have created in your HASS profile under the security tab Temperature Unit The unit the temperature is returned in, there is no way to ge this from HASS so you must provide it Temperature Sensor The HASS sensor to read the temperature from, see note below Humidity Sensor The HASS sensor to read the humidity from, see note below Pressure Sensor The HASS sensor to read the pressure from, see note below HASS Sensors
The HASS sensor drop downs will be automatically populated from your HASS installation but ONLY if the URL and Long Term Token are correct. If you do not see any sensors then check these values
-
One Wire Sensors
Enable The 1-Wire Interface
Before using any 1-Wire devices you must enable the 1-Wire interface using the raspi-config utility. To enable the interface run raspi-config and navigate to Interface Options->1-Wire and enable the interface. You may need to reboot the pi before the interface works
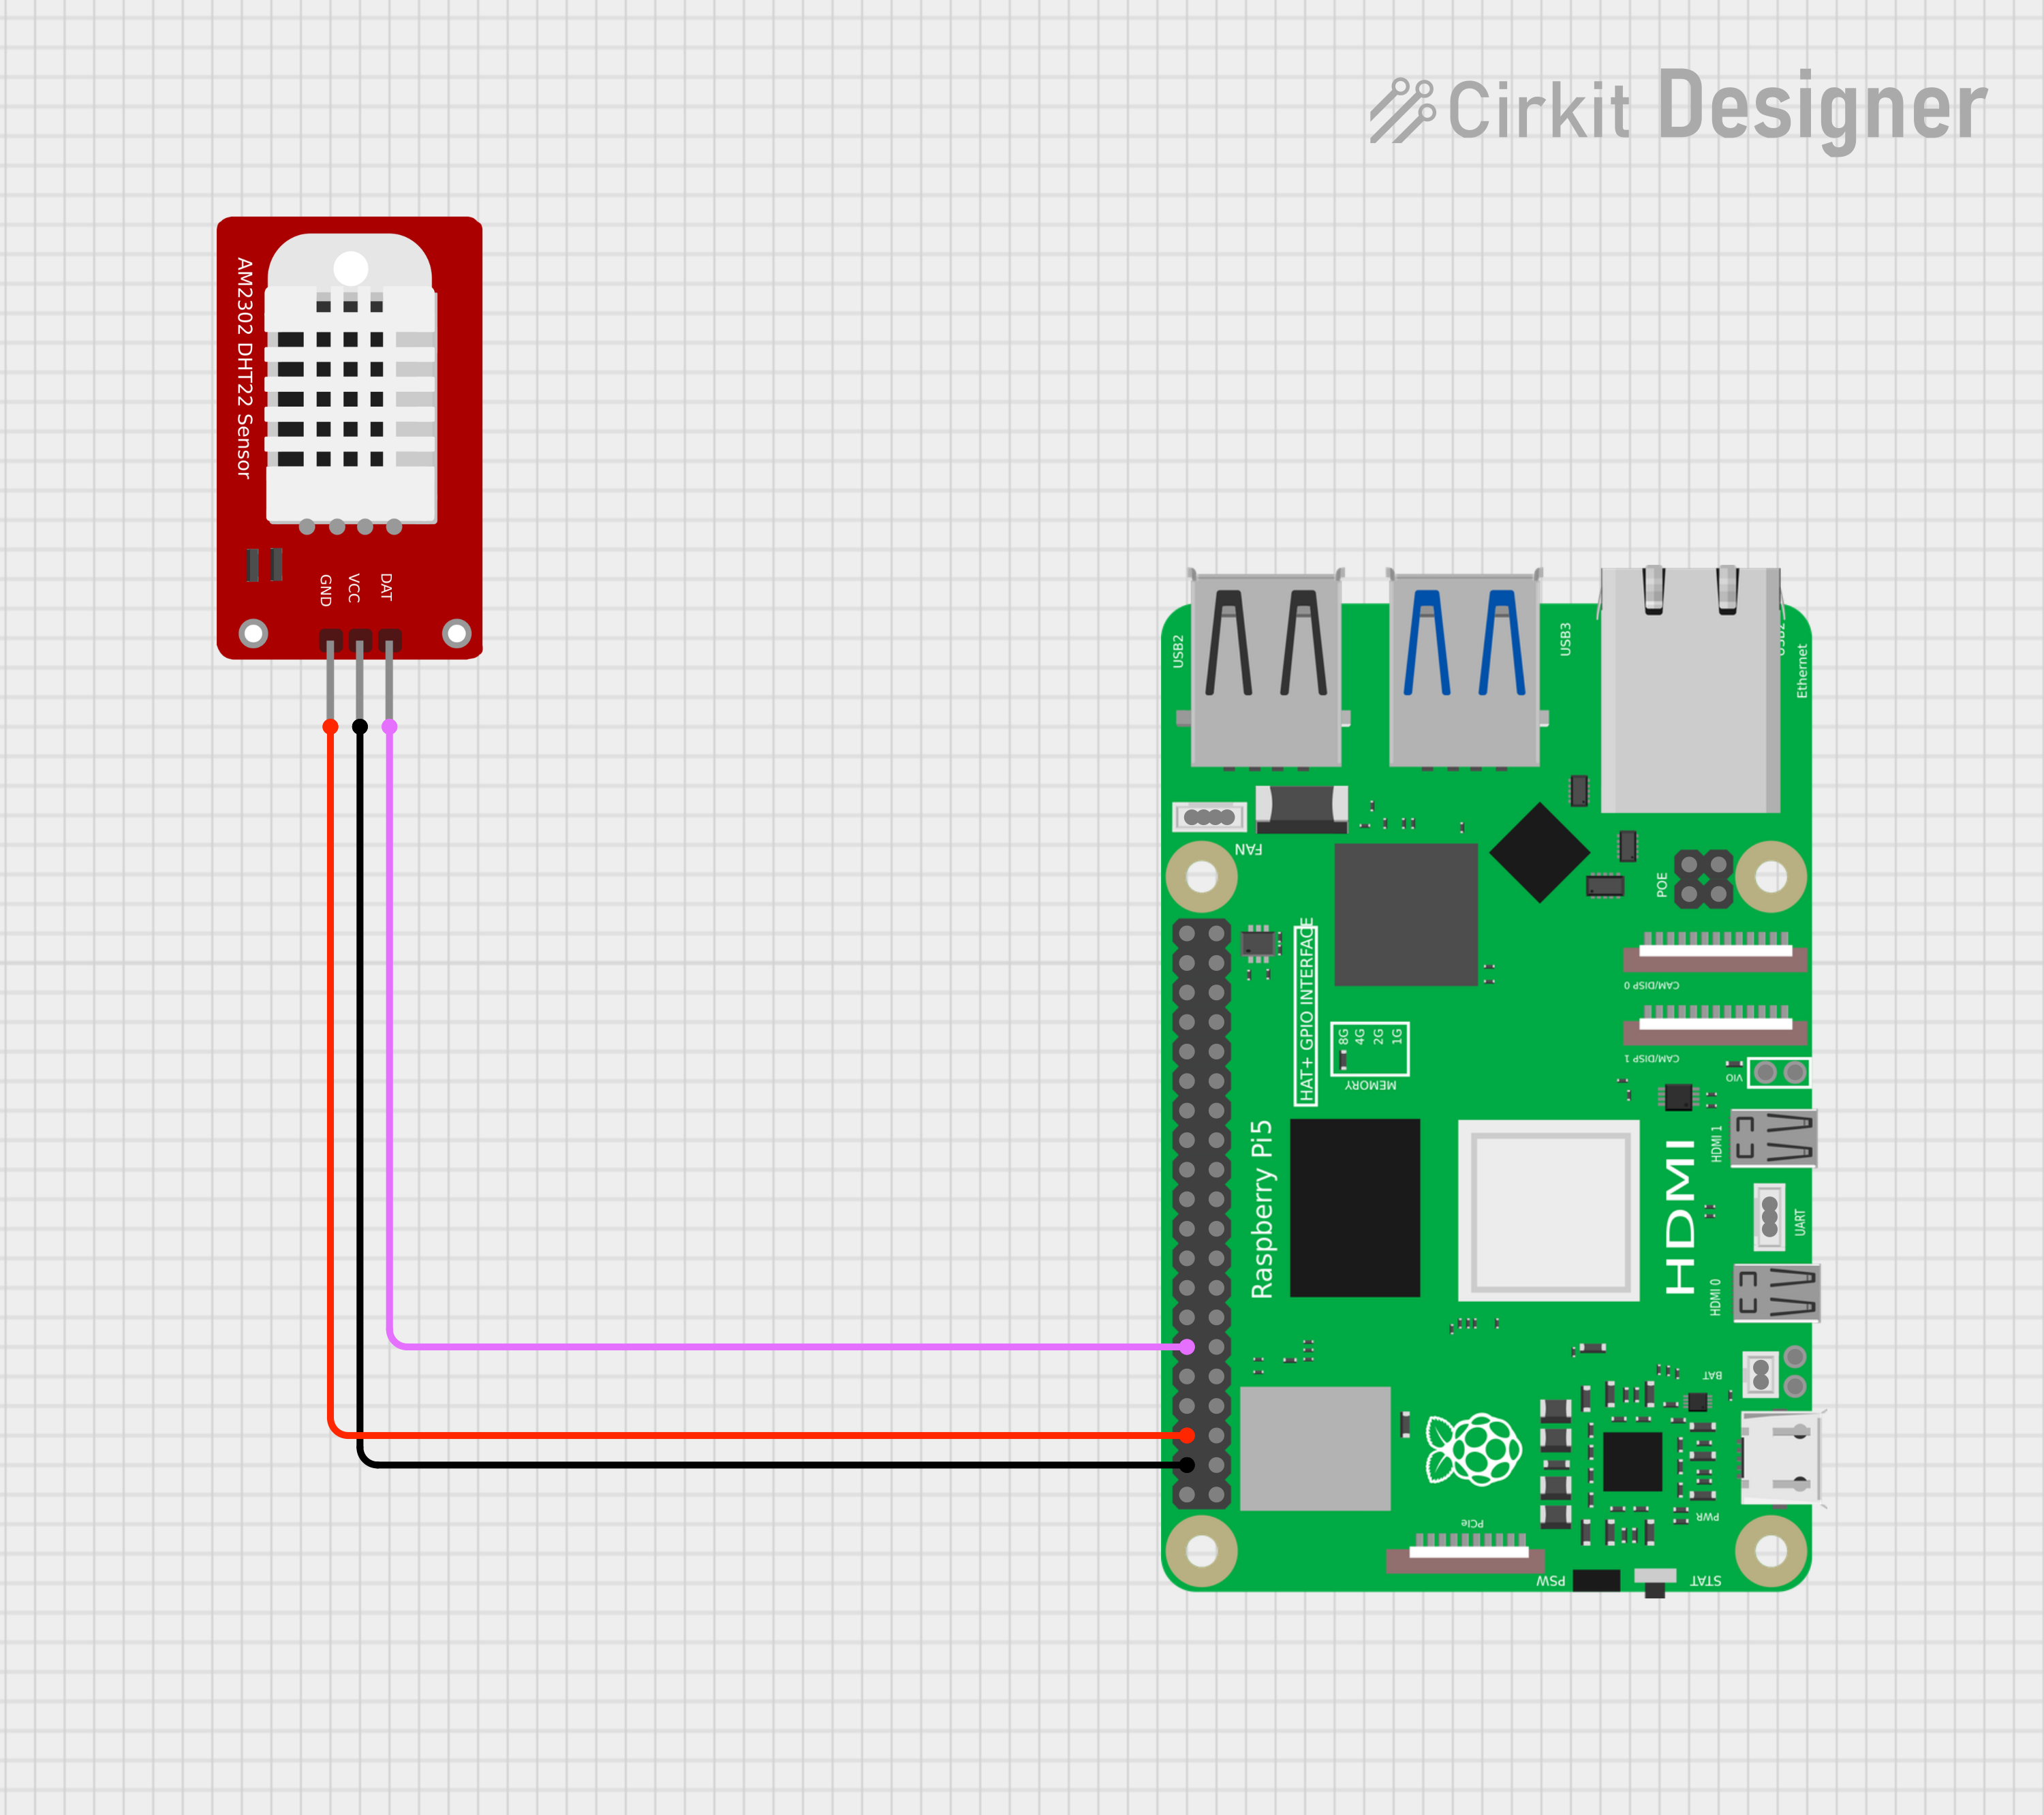
The DHT22 is a low-cost, digital sensor that measures both temperature and relative humidity using a capacitive humidity sensor and a thermistor. It outputs calibrated digital signals on a single data pin, works with a voltage range of (3.3V) to (5V), and has a temperature range of (-40) to (80)°C.
The AM2302 is the same as a DHT22
The DHT11 is a low-cost, digital sensor that measures both temperature and relative humidity using a single-wire interface. It is used in projects requiring environmental monitoring, such as in greenhouses or home automation systems. The sensor uses a capacitive humidity sensor and a thermistor for measurement, and its small size and low power consumption make it suitable for a variety of applications.
Adafruit provide Documentation and sample code for both sensors
Settings
Setting Description Sensor Name The name of the sensor, this will be available for use in overlays Input Pin The GPIO pin the sensor is connected to. You can use any Digital GPIO pin Retry Count The number of times to retry reading the sensor if it fails to read Delay The delay in ms between each attempt to read the sensor Timeouts
The DHTxx series of sensors are notorious for failing to read, especially if you attempt to read from them too quickly. The rerty count and delay in the settings will allow you to 'tune' the sensor to get reliable readings
Schematic
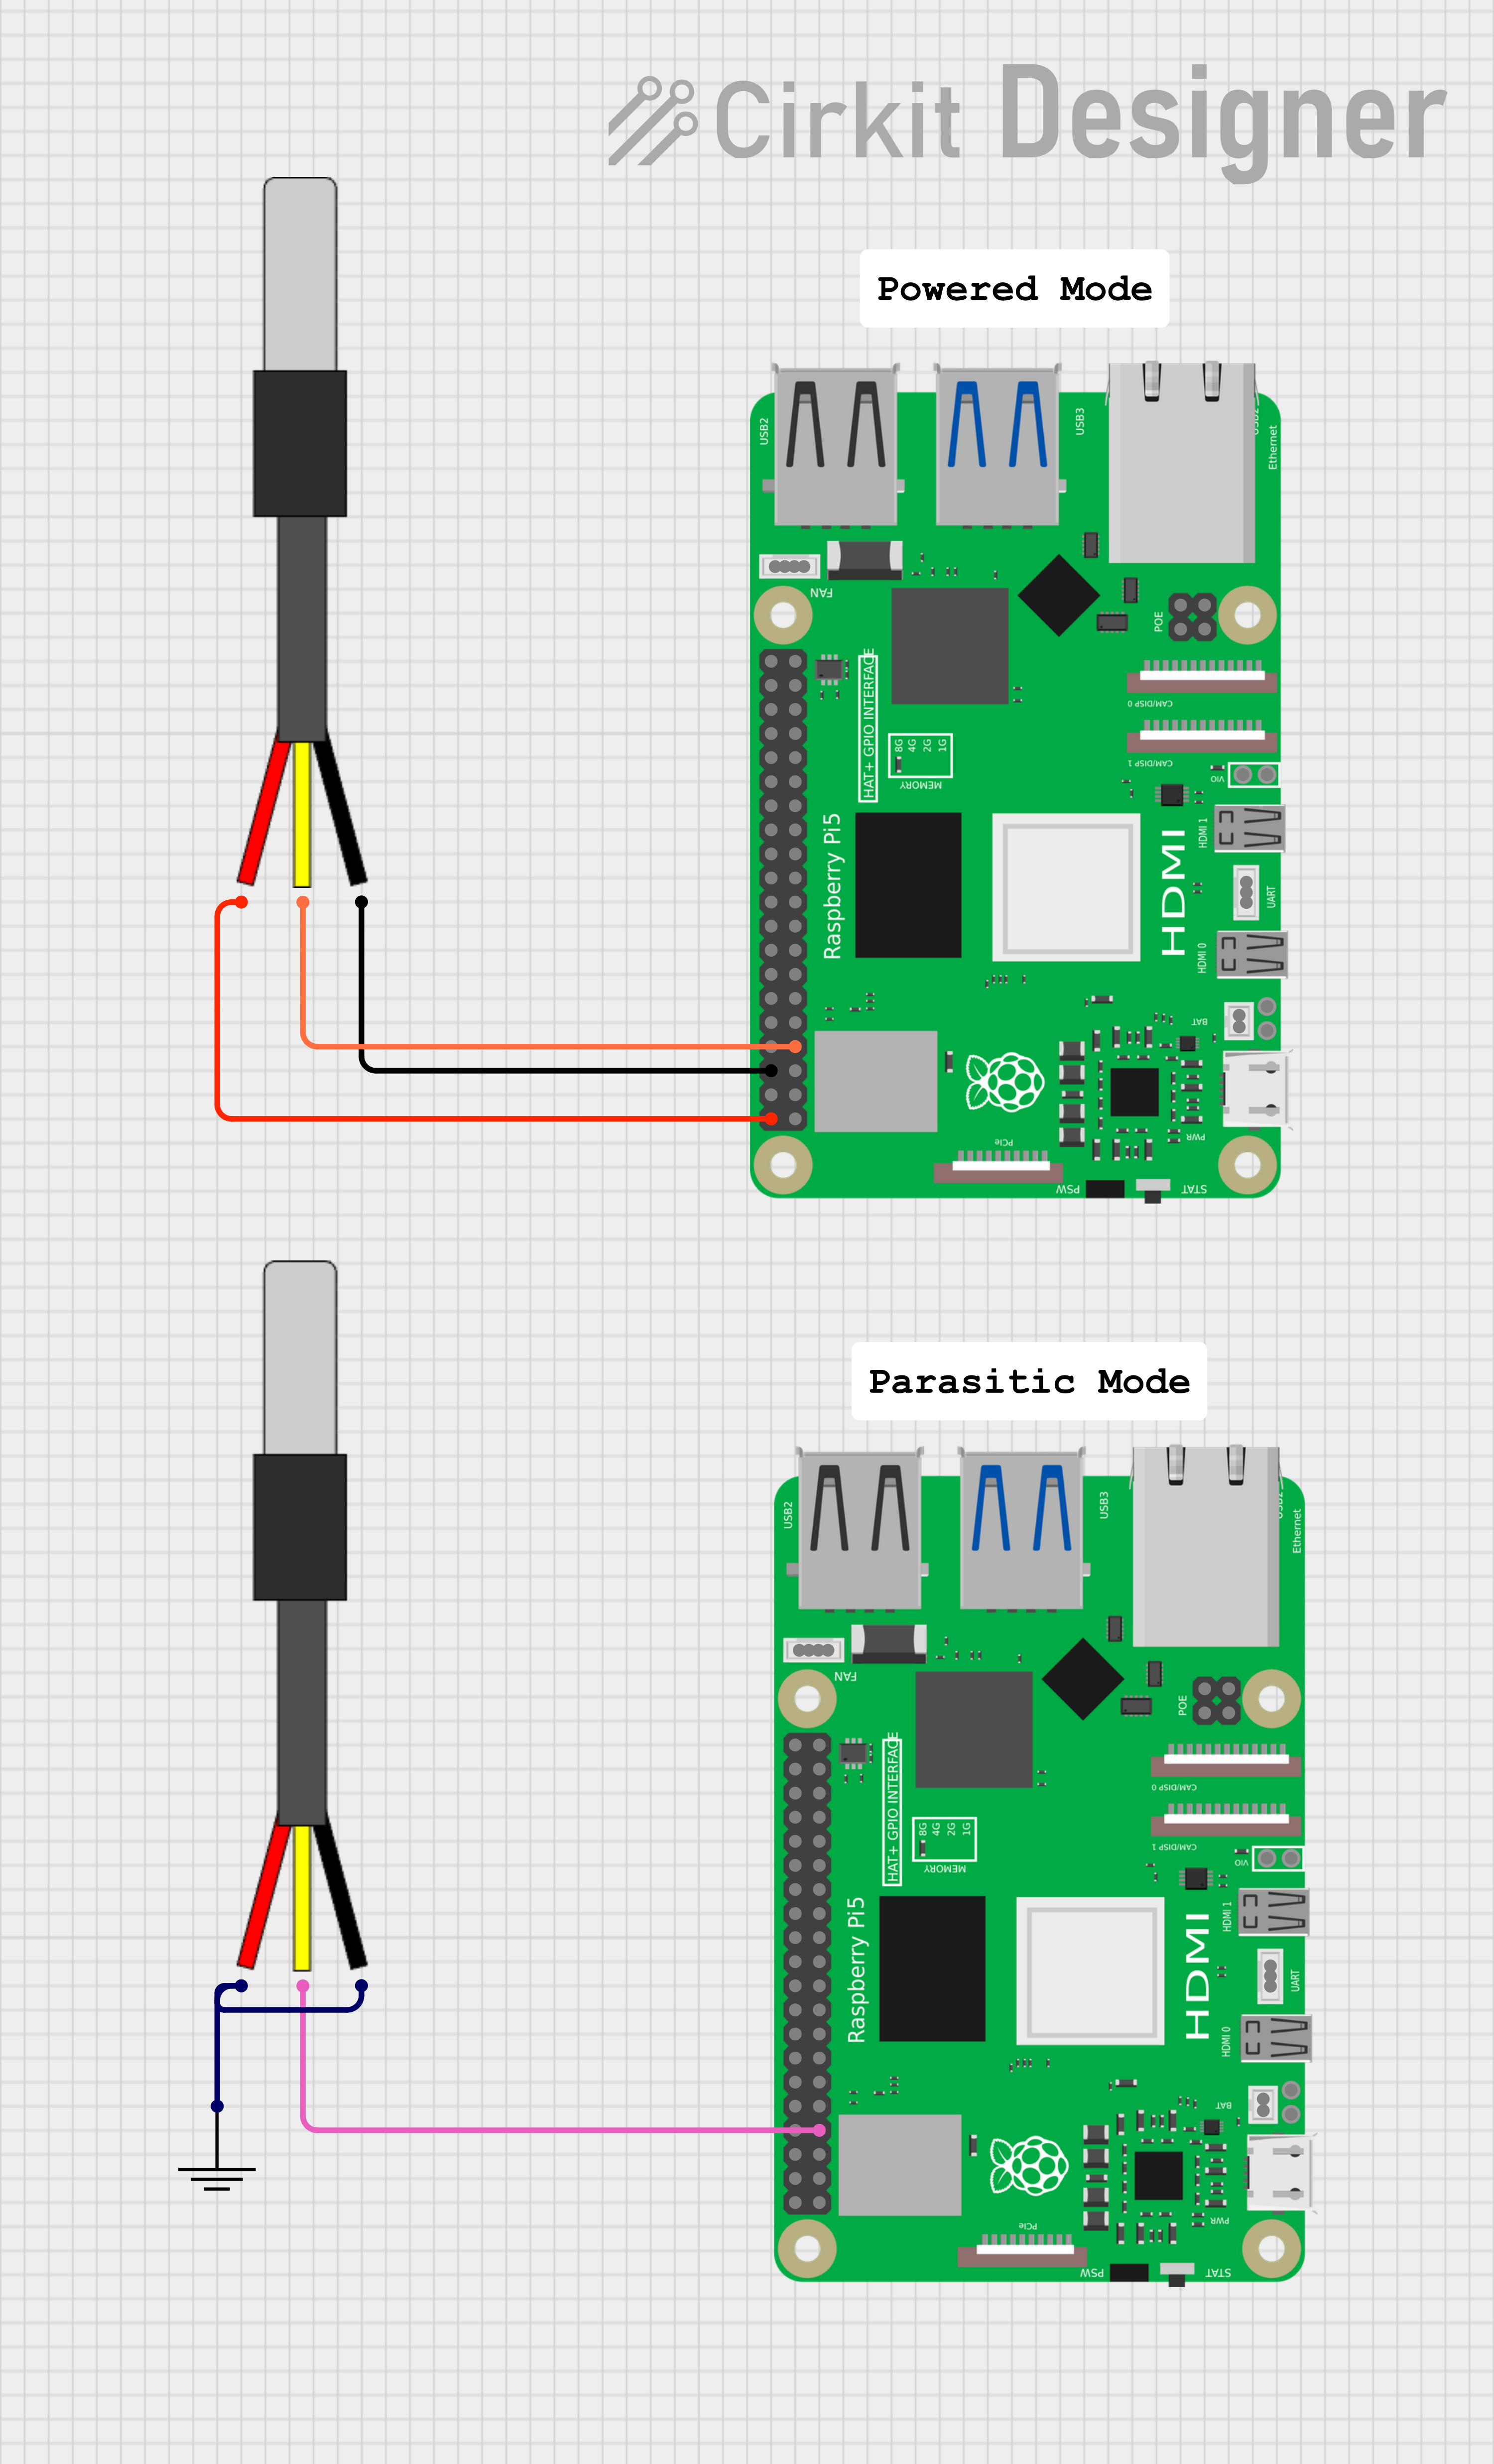
The DS18B20 is a digital temperature sensor that communicates over a unique 1-Wire bus, requiring only a single data line for communication. It can measure temperatures from -55°C to +125°C (-67°F to +257°F) with a resolution of 9 to 12 bits and an accuracy of ±0.5°C within a specific range. It can operate using either a traditional 3-wire setup or in "parasite mode," which allows it to draw power directly from the data line, eliminating the need for an external power supply. Adafruit Documentation
Settings
Setting Description Sensor Name The name of the sensor, this will be available for use in overlays Address The 1-wire address of the sensor Multiple sensors
It is possible to connect myltiple sensors ot the pi but determining the 1-Wire address can be tricky. The best method is to connect each device in turn and observe the 1-Wire addresses that are available.
Schematic
Sensor 1 to 3
These tabs allow you to define upto three additional sensors that can be used to
- Display information on the overlay
- Control a GPIO pin in the temperature is above a maximum
The sensors available are defined in the Sensor Fields section.
Additional Settings
| Setting | Description |
|---|---|
| Sensor Name | The name of the sensor, this will be available for use in overlays |
| Address | The 1-wire address of the sensor |
| Max Temp | The temperature at which point the GPIO pin will be set high |
| GPIO Pin | The GPIO pin to use |
| GPIO on | The label to use on the overlay when the GPIO pin is High i.e. on |
| GPIO off | The label to use on the overlay when the GPIO pin is Low i.e. off |
Available in
-
Daytime
- The Day time pipeline
-
Nighttime
- The Night time pipeline
-
Periodic
- The Periodic pipeline