Dew Heater
Important
This module requires external hardware and some basic knowledge of electronics
This module allows you to control a GPIO pin that can in turn be used to drive a dew heater. The GPIO pin cannot directly drive the heater, instead it must be used to drive a mosfet that in turn controls the heater.
Whilst the electronics to do this are beyond the scope of this documentation some examples are provided as is.
The Environment module is also required to provide the temperature and humidity for this module. The environment module should be placed before this module in the pipeline.
There are two modes of operation for the dew heater
- Digital - The heater is either on or off
- Pulse Width Modulation (PWM) - The heater voltage is 'controlled' by the mosfet between 0 and 100%. This allows for finer control of the heater
Settings
The following settings are available in the module
Sensor Tab
The settings on this tab control how the module gets its temeprature and humidity data
| Setting | Description |
|---|---|
| Sensor Type | The type of sensor to use. See notes below |
| Temperature Variable | The variable to use for temperature. Do not change this unless you know what yo are doing |
| Humidity Variable | The variable to use for humidity. Do not change this unless you know what you are doing |
Sensor Type
There are several options available but the preferred method is to use the 'Allsky' option. This will read the values generated by the Environment Module. The hardware sensor options provided in this setting are deprecated and will be removed in a future release.
The options for sensors other than Allsky are not covered here. Please refer to the Environment module for details on howto use a hardware sensor
Heater Tab
The settings on this tab determine how the heater is controlled
| Setting | Description |
|---|---|
| Heater Pin | The GPIO pin the heater control is connected to |
| Use PWM | If enabled PWM will be used to control the dew heater |
| Min PWM Temp | The minimum temperature for PWM, this equates to a 0% duty cycle |
| Max PWM Temp | The maximum temperature for PWM, this equates to a 100% duty cycle |
| Extra Pin | A second pin that is controlled in the same way as the Heater Pin |
| Use PWM | Use PWM for the Extra pin, MIn and Max are the same as the main PWM controls |
| Startup State | The intial state of the heater when starting up |
| Invert Relay | If using a relay (NOT RECOMMENDED) invert the on state |
| Invert Extra | If using a relay (NOT RECOMMENDED) invert the on state |
Dew Control Tab
The settings on this tab determine when the heater is enabled or disabled
| Setting | Description |
|---|---|
| Delay | The number of seconds between reading the sensors, 0 switches this off and the sensor is read every time the module runs |
| Limit | If the temperature is within this many degrees of the dew point, the heater will be enabled or disabled. This is probably the most important setting as it determines if the heater is on or off |
| Forced | Always enable the heater when the ambient termperature is below this value; 0 disables this. This is useful as a quick override if you are going to have prolonged dew |
| Max Time | The maximum time in seconds for the heater to be on. 0 disables this. |
| Daytime Disable | Disable the dew heater during the daytime |
Debug Tab
The settings on this tab are used to help test the module
| Setting | Description |
|---|---|
| Debug Mode | Enables debug mode. In this mode the sensor is NOT read the values in this tab are used |
| Temperature | The temperature to use for testing |
| Dewpoint | The depoint to use for testing |
You can use these values to force the temperature and dewpoint values used by the module. This is useful for testing that the other settings are producing the results you expect.
Schematics
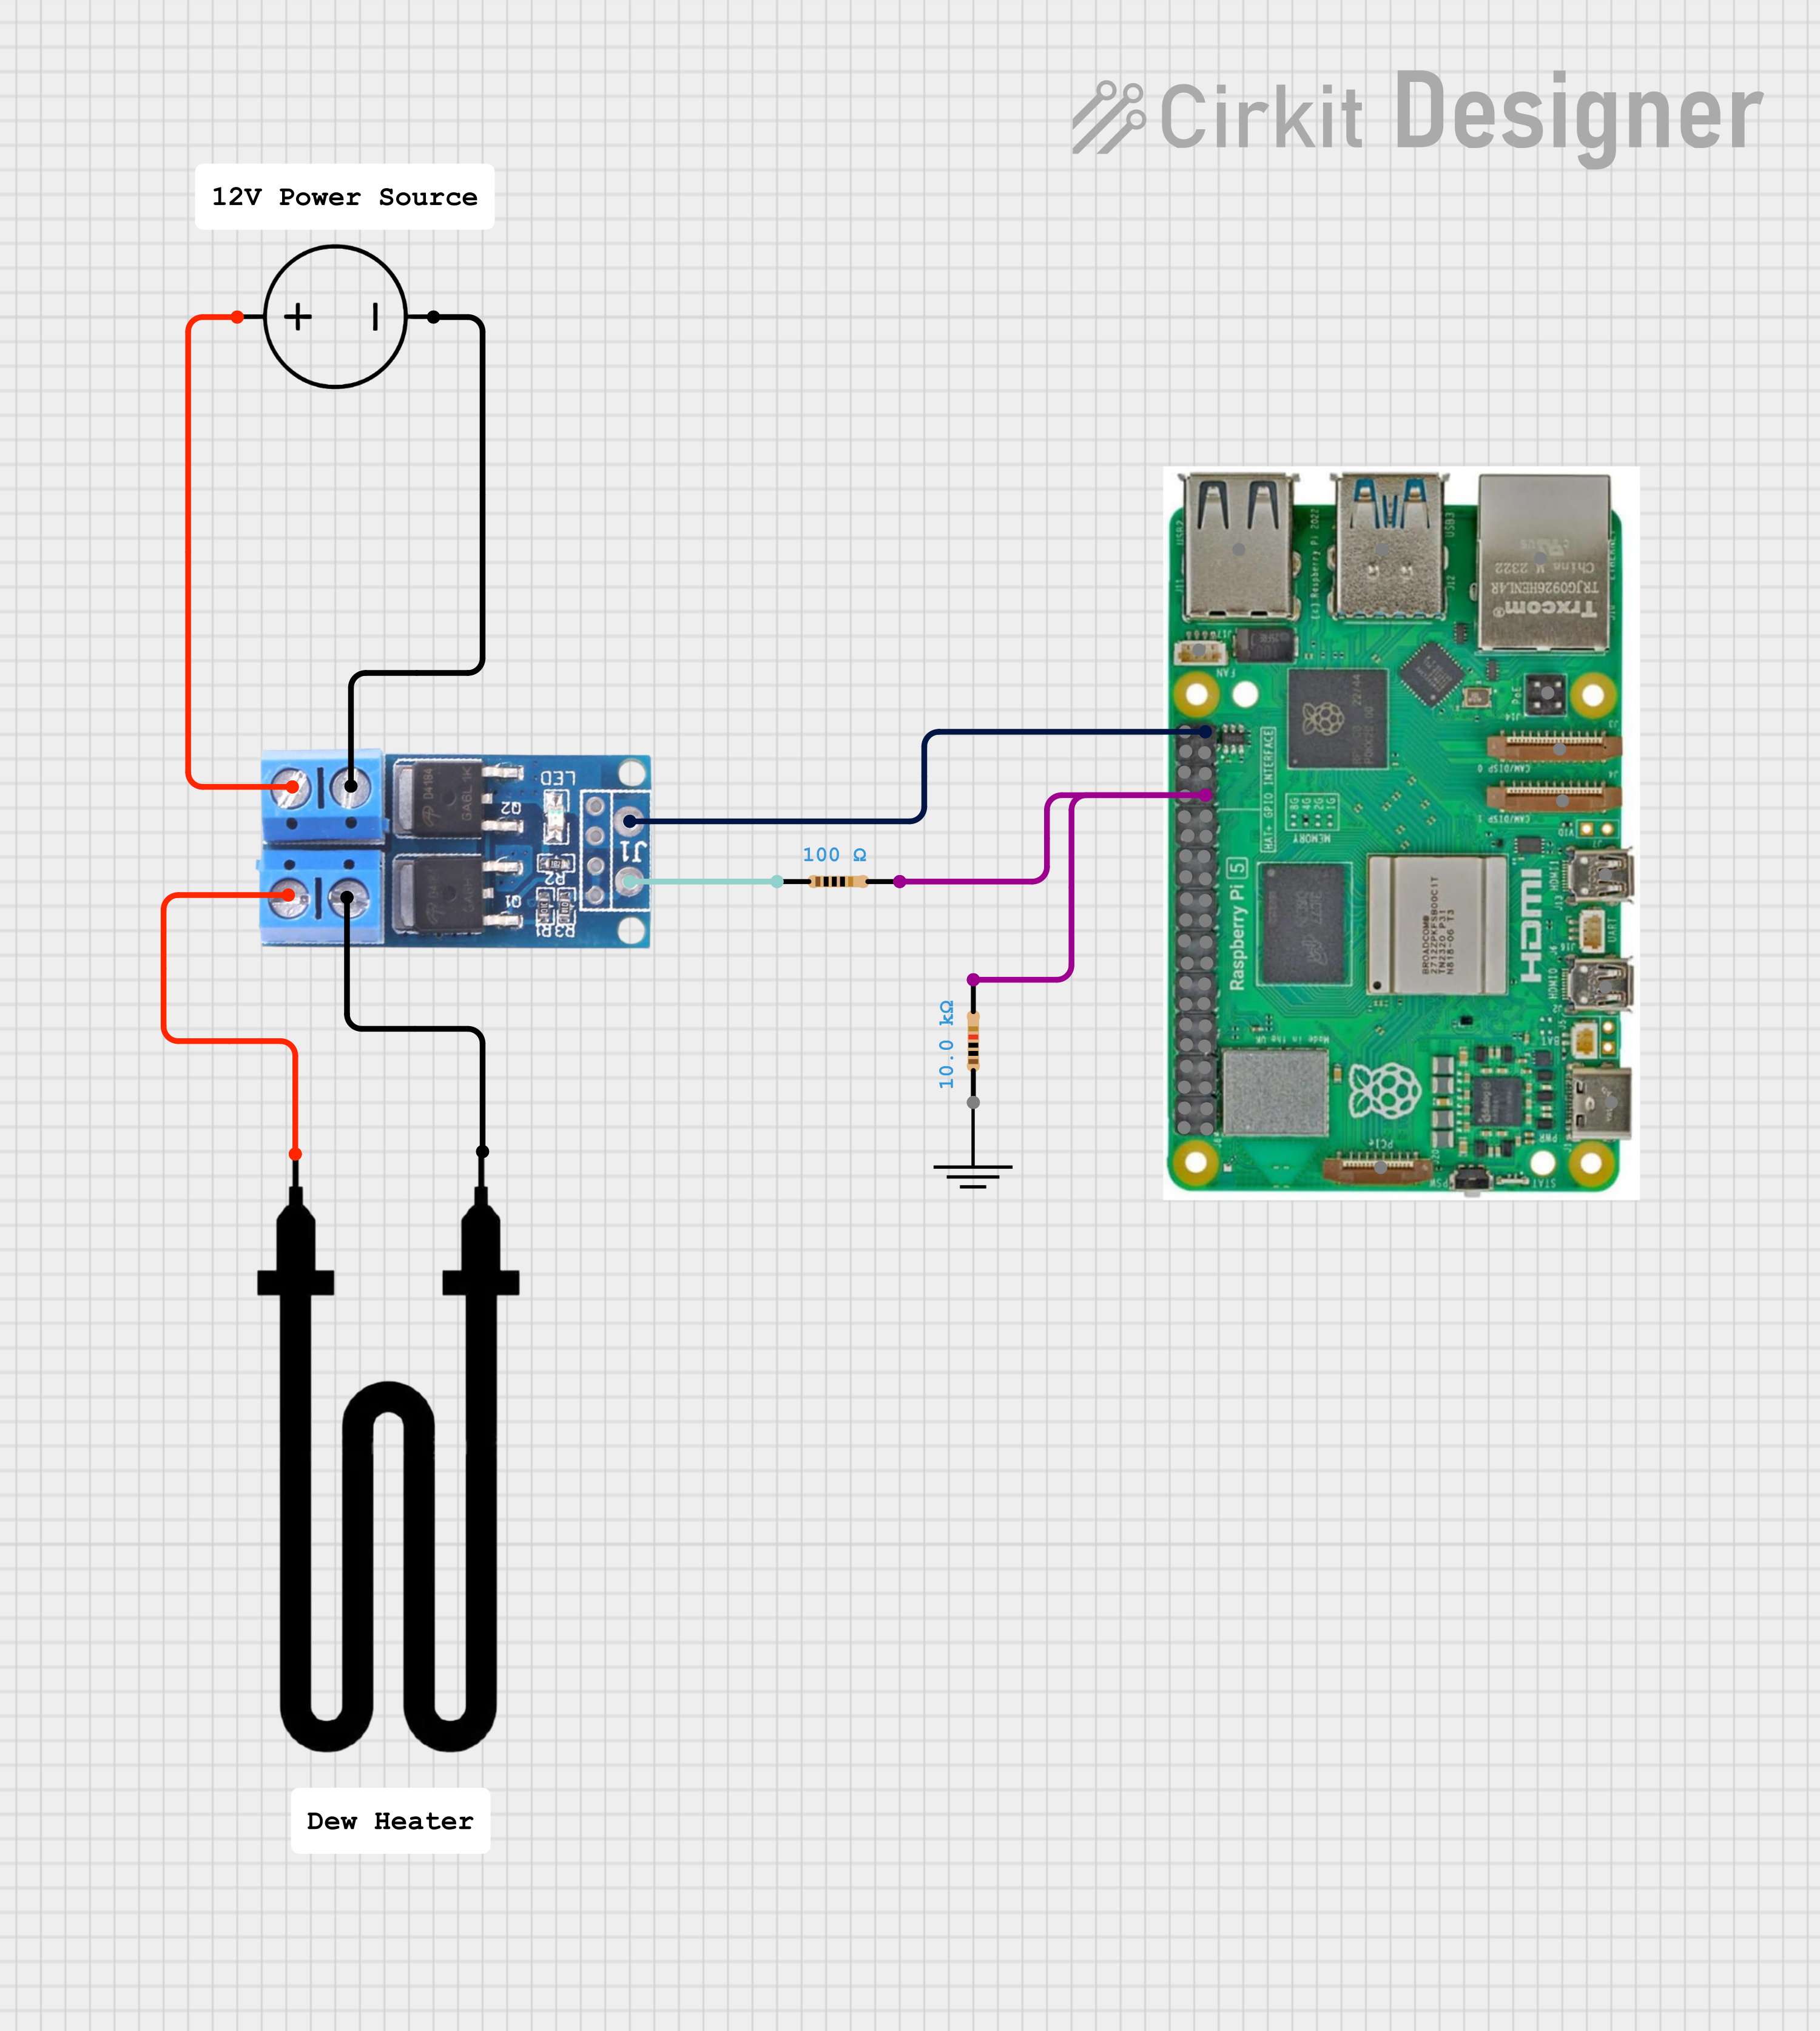
Example Mosfet driven dew heater
Tips
Setting up the dew heater can be a little tricky so this section provides some tips on gettin git all running.
Its best to start without PWM enabled just to confirm that your hardware is all working so to do this;
- Ensure that ALL PWN options are off
- Set the correct GPIO pin for your heater
- Set the limit to 5
These setting will enable the dew heater when the temperature is within 5 degrees or less of the dew point
FAQ
-
My heater stays on all of the time
- Set the Allsky debug level to 4 and use the 'Test Module' button in the dew heater settings. This will display some debug messages explaining why the heater is in the state it is
- Check the limit value is not too large. Since the heater is enabled when the dewpoint is within this many degrees of the temeprature large values will cause the heater to stay on
- Check the 'Forced Temperature' value is not set. Setting this to a low value will also cause the heater to remain on
- Check your hardware. If you are using a relay, not recommended, then some require an inverted output. The 'Invert relay' option will enable or disable this.
-
My heater never switches on
- Set the Allsky debug level to 4 and use the 'Test Module' button in the dew heater settings. This will display some debug messages explaining why the heater is in the state it is
- Check your hardware. If you are using a relay, not recommended, then some require an inverted output. The 'Invert relay' option will enable or disable this.
-
My heater switches on but doesnt clear the dew
- Confirm that the heater has sufficient power
Important Notes
Relays
You will see other examples of people using relays to drive the heater but this is not recommended for the following reasons
-
GPIO pins cannot supply enough current
- Raspberry Pi GPIO can output max ~16 mA, with a TOTAL budget of 50 mA across all pins.
- Most mechanical relay coils need 70–100 mA (sometimes more).
-
Relay coils generate voltage spikes (back EMF)
- A relay coil is an inductor. When switched off, it releases a high-voltage spike (often 100–200 V).
-
Without protection:
- GPIO pin gets hit with high voltage
- Pi can lock up, reset, or permanently die
Blocks
Several blocks are provide to make adding data to the overlays easier. These can be access from the variable manager in the overlay editor
Charts
A variety of charts are available, see the chart manager for details
Available in
-
Daytime
- The Day time pipeline
-
Nighttime
- The Night time pipeline
-
Periodic
- The Periodic pipeline